The ssh command in Linux is used to securely connect two computers (client and server) following the SSH protocol. You can execute commands from a remote location and transfer data using the ssh command in Linux. The data transfer is encrypted which prevents hackers from accessing them. In this article, I will show you how to set up a server on your own. Also, I will give you some practical examples of the ssh command in Linux.
A. Description
The “ssh” of the ssh command in Linux stands for “Secure Shell”. SSH is an internet protocol that allows a secure connection in an insecure network. It was developed by Tatu Ylonen in 1995 to replace Telnet which is vulnerable to attacks. The ssh command in Linux uses SSH protocol. The ssh (or ssh client) command is a program for logging into a remote machine and executing commands that can also provide secure encrypted communication.
B. Syntax
The syntax of the ssh command in Linux is slightly different. However, you can provide it with multiple options. The syntax goes like the following:
ssh [OPTION]... username@ip_addressC. Options
As I have mentioned earlier, the ssh command in Linux has a lot of options. You can check them by yourself by typing the command below in the Ubuntu Terminal:
man sshUseful Options
- -4, only uses IPv4 addresses.
- -6, only uses IPv6 addresses.
- -C, compresses data.
- -i, is used to login with a private key.
- -l, specifies the user.
- -p, is used to specify a port.
How to Set Up a Server
As I have mentioned earlier, you need a server computer and one client computer to connect them using the ssh command in Linux. However, I don’t have access to any server right now and I think most of you don’t have either. But I have an Ubuntu installed in a virtual machine called VMware Workstation. I will use that as a server and I will show you how you can set up a server. Finally, I will use Windows 10 as a client. I will use Windows Powershell to access the server. Now you might ask, aren’t we supposed to talk about the ssh command in Linux? Good thing, ssh command and all its options are also available in Windows. You can access a Linux server with another Linux client using the same commands which will be shown here. Now, let’s get started and set up our own server.
You need to follow the steps below to set up a server:
❶ At first open an Ubuntu Terminal
❷ Copy the following commands in the command prompt and press ENTER.
sudo apt-get install openssh-serverYou will see an output like below. Wait until the installation is completed.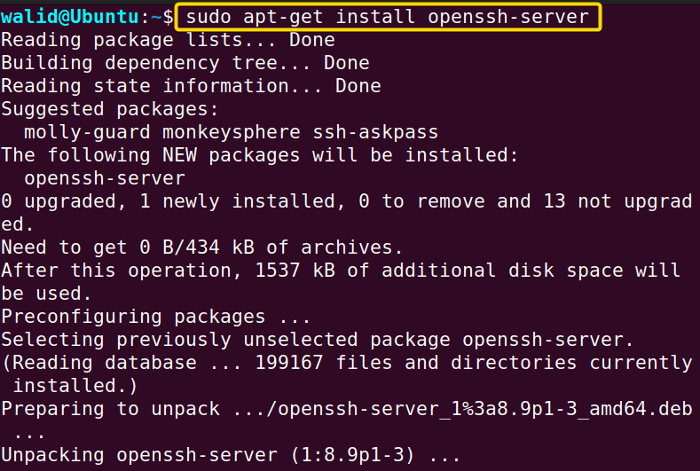 ❸ Sometimes the server is turned on automatically. However, sometimes you need to start it manually. To start the server and check the status, copy the following two commands:
sudo service ssh start
sudo service ssh status
If you see “active (running)” like below then you are all set up. Well done.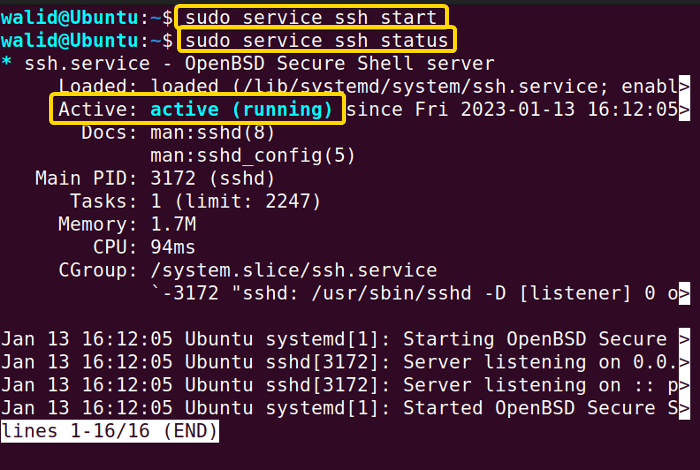 ❹ Now to access a server, you need an IP address. To find the IP address of your server, copy the command below and press ENTER:
ifconfigYou will see inet followed by your IP address at the beginning like below.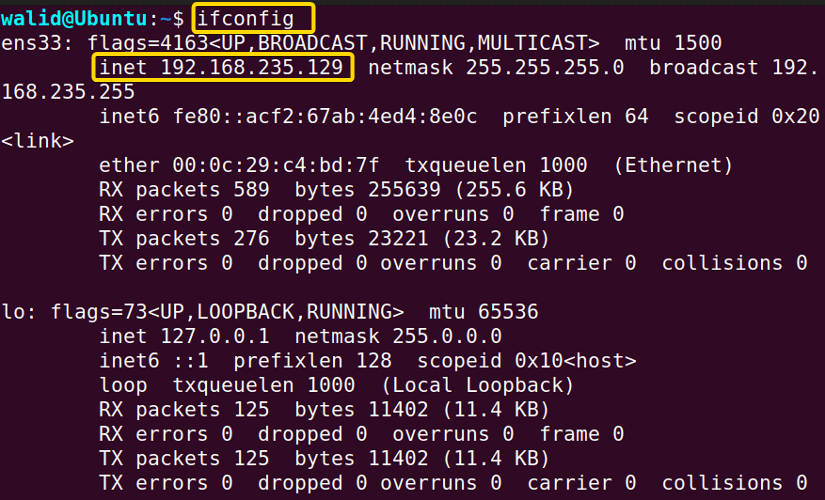 If you don’t have ifconfig on your machine, copy the command below to install it:
sudo apt-get install net-toolsYou will see output in your Terminal like below.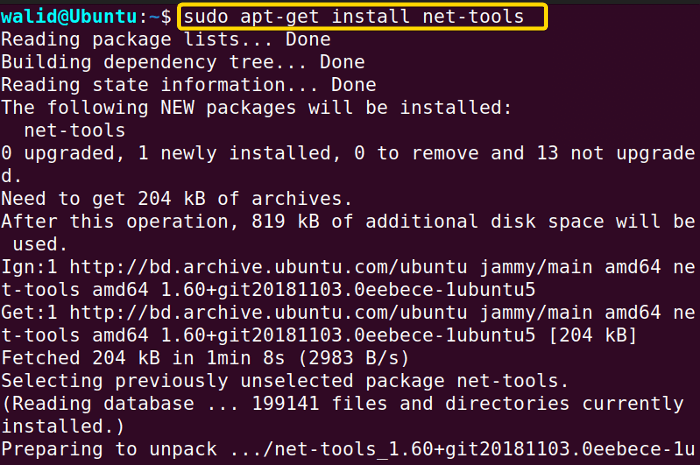
Practical Examples of the “ssh” Command in Linux
In this section, I will show you the use of the ssh command in Linux with practical examples. Make sure you follow every step carefully.
Example 1: Connect to Server Using the “ssh” Command in Linux
Earlier, I have shown you how to find IP address of your server. Now I will show you how to access that server using the ssh command in Linux.
If I write “whoami” command in my server, I get the username which is walid. Let’s say I get the same result or not after accessing the server by a client. Now follow the steps below: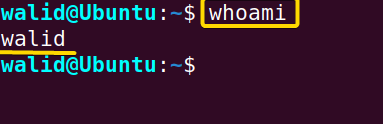 Steps to Follow >
➊ At first launch the Windows Poweshell
➋ Write a command like below in the command prompt:
ssh [email protected]➌ Now, press the ENTER button.
❹ Write “yes” if you are accessing the server for the first time and press ENTER.
❺ Now provide the password associated with the username and hit ENTER again.
Output >
The output will be like the below. The Terminal is started with “walid@Ubuntu” like the server. And when I wrote the command “whoami”, it is showing walid, exactly like the server. Now you can do pretty much anything on the server even if you are on the other side of the world.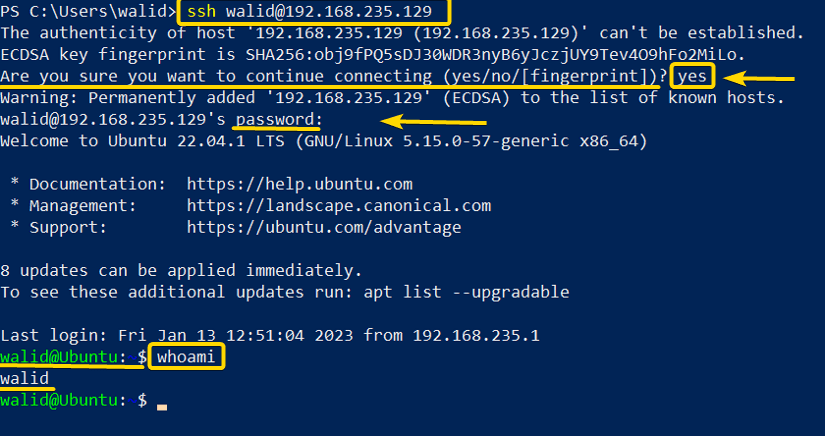
Similar Readings
- The “iptables” Command in Linux [6 Practical Examples]
- The “netstat” Command in Linux [22 Practical Examples]
- The “nslookup” Command in Linux [12 Practical Examples]
- The “ufw” Command in Linux [12+ Practical Examples]
Example 2: Run Commands in a Server Using the “ssh” Command in Linux
In this example, I will execute a command in the server from the client. I will create a file and put some text in it from the client. Then I will view the file from the server. You can do that with me by doing the following:
Steps to Follow >
❶ Open a Windows Powershell first.
❷ Then log into the server (see Example 1)
❸ Copy the following command in the command prompt and press ENTER:
echo “Welcome from the local machine!” > welcome❹ Now launch an Ubuntu Terminal
❺ Insert the following command and hit the ENTER button from the keyboard:
cat welcomeOutput >
The image is from Windows Powershell below. Here the output of the echo command is redirected into the welcome file. Now, I viewed the welcome file from the server and see, it is exactly the same text!
Example 3: Run Commands without Creating a Shell
Now, I will run a command without even creating a shell. In this example, I will create a new directory from the client and show you the directory from the server. You do the same, follow the steps below:
Steps to Follow >
❶ At first open a Windows Powershell from the Windows operating system.
❷ Then copy the following command in the command prompt and press ENTER:
ssh [email protected] mkdir newdirectory❸ Provide password and press ENTER again.
❹ Now launch a Terminal in Ubuntu and write the command below:
ls❺ Press ENTER from the keyboard.
Output >
Here I sent a command without even logging into the server. In this case, I made a directory named newdirectory in the home directory. Here I listed out all the contents in the home directory and guess what, the newdirectory directory is there.
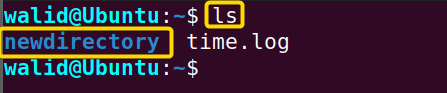
Example 4: Log in with Different Username Using the “ssh” Command in Linux
The “-l” option in the ssh command in Linux is used to specify a username. My server has another user named jim. In this example, I will log into the server using the option “-l”. Practice this with me by doing the following:
Steps to Follow >
❶ Open Windows Powershell from the start menu.
❷ Copy the following command in the command prompt:
ssh -l jim 192.168.235.129❸ Press the ENTER button.
Output >
As you can see, I have logged into the account jim and there is jim@Ubuntu in the Terminal, similar to the server.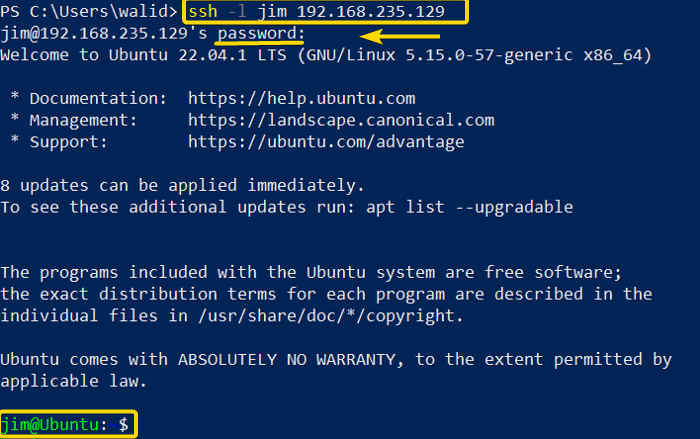
Example 5: Change the Port of a Server
The default port of SSH is 22 as it is assigned by IANA (Internet Assigned Numbers Authority). However, it is possible to change the port number. A port can be anything you want but it is a good practice to assign a number greater than 1024. In this example, I will assign port 3017. This example can be difficult for some of you. So, do the following step-by-step with me:
Steps to Follow >
❶ Press CTRL + ALT + T to launch an Ubuntu Terminal.
❷ Write the following command in the command prompt and press ENTER:
sudo nano /etc/ssh/sshd_config❸ Find and edit, or add a new line like below:
port 3017❹ Restart the server by typing the following command and hit ENTER:
sudo service ssh restart❺ Enable firewall and allow port 3017 by typing the following command one by one and press ENTER:
sudo ufw enable
sudo ufw allow 3017
❻ (Optional) Check whether port 3017 is open or not by the following command:
sudo ufw status❼ (Optional) Check if the server is listening to port 3017 or not by the following command:
netstat -tulnpOutput >
Here, I have attached some screenshots to help you with the process. The first image below shows how you should edit the sshd_config file.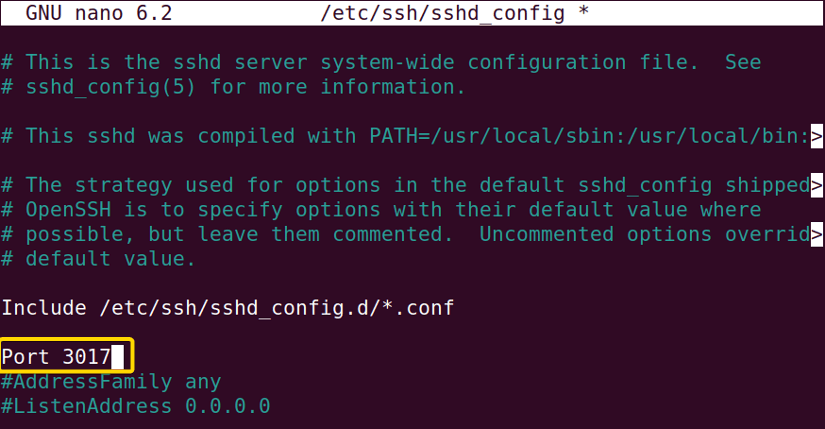 This image shows the execution of all the commands. From ufw status, you can see, port 3017 is active.
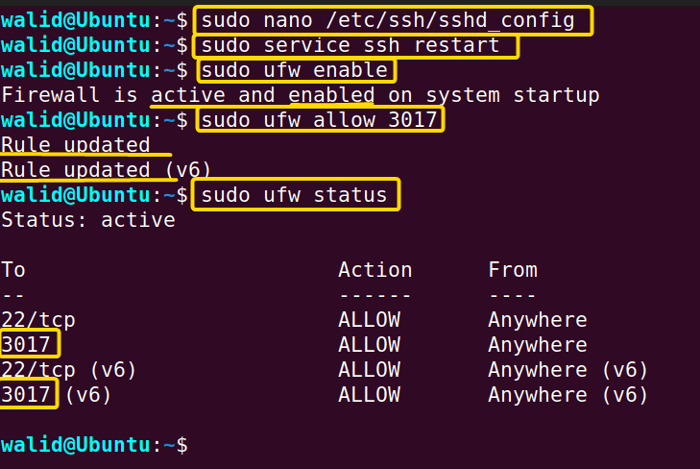 And here, you can see that the server is listening to the port 3017.
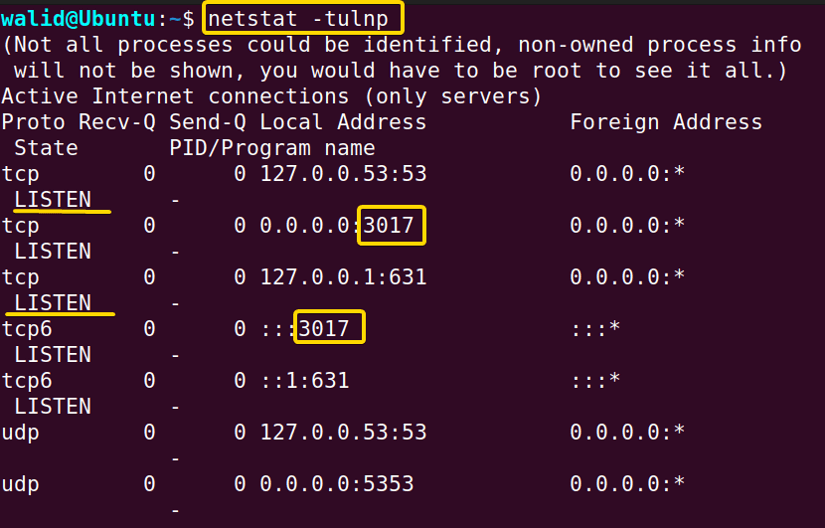
Example 6: Connect to a Server with Different Port Using the “ssh” Command in Linux
In Example 5, you have seen how to open a new port. Now I will show you how to access the server with that port using the ssh command in Linux. I will option “-p” for this purpose. Do the following:
Steps to Follow >
❶ Open Windows Powershell first.
❷ Write the following command in the Powershell:
ssh -p 3017 [email protected]❸ Press the ENTER button from the keyboard.
❹ Provide the password and hit ENTER.
Output >
As you can, I have logged into the server through port 3017.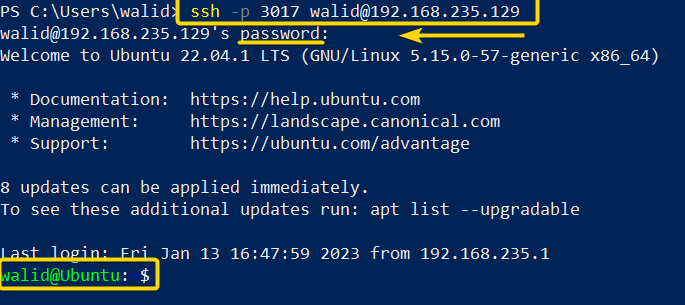
Example 7: Copy File Using “scp”
The scp stands for “secure copy”. It is a tool to transfer files between client and server using SSH protocol. In this example, I will show to copy a file using scp.
As you can see, in the client computer (Windows), there is a file named local_file.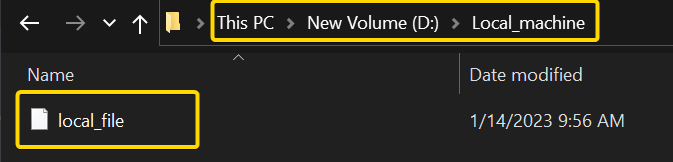 And there is a file named remote_file in the server (Ubuntu).
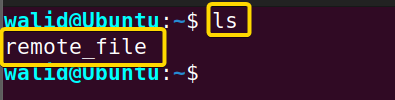 Now, I will copy the local_file in the server and the remote_file in client. Follow the steps below:
Steps to Follow >
❶ At first press Windows_key + R, write “powershell” and press ENTER to open Windows Powershell
❷ Copy the following command to copy a file from client to server:
scp D:\Local_machine\local_file [email protected]:~❸ Give the password and press ENTER button.
❹ Write the following command to copy a file from server to client:
scp [email protected]:~/remote_file D:\Local_machine❺ Again, provide the password and hit the ENTER button.
Output >
Here, at the beginning, I copied the local_file to the server. That’s why they provided the path of the file in Windows first, then the path of its destination. Similarly, I copied the remote_file to the client. Here, I gave the location of the file in the server, followed by its destination. Moreover, 100% indicates the transfer is completed. Now, you can the local_file in the home directory of the server.
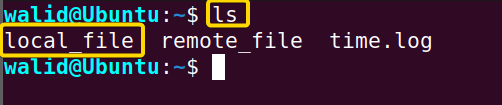 And, the remote_file is in the client.
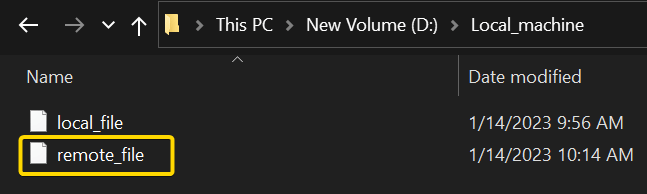
Example 8: Copy File using “sftp”
In the previous example, I showed you coping a file using scp. Now I will show you how to copy files using sftp. The sftp stands for “Secure File Transfer Protocol”, which is similar to ftp. However, sftp uses SSH protocol to transfer files. Here I will copy a file named local_file to server and remote_file from server to client.
Here you can see the local_file in my client computer (Windows).And the remote_file in the server computer (Ubuntu).Now I will copy files using sftp. You can try it with me by doing the following:
Steps to Follow >
❶ At first launch Windows Powershell.
❷ Copy the following command in the Powershell:
sftp [email protected]❸ Give the password and press ENTER.
❹ Use the following command to copy the file from client to server and press ENTER:
put D:\Local_machine\local_file❺ Write the following command to copy the file from the server to the client and press ENTER.
get remote_file D:\Local_machine❻ Write the following command to exit.
exitOutput >
Here, I establish a connection at first. Then used put to copy file to the server and get to copy file from the server to the client.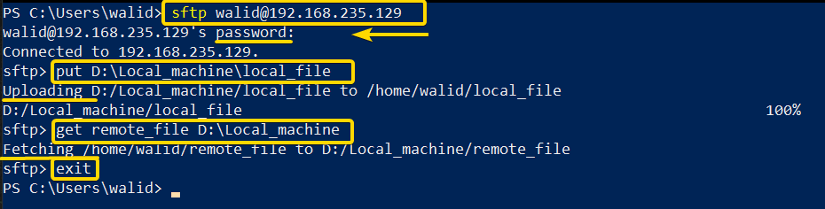 See, there is a file named local_file in the home directory of the server (Ubuntu).
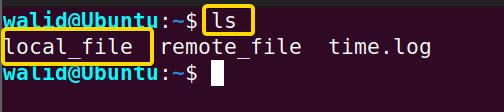 And, the remote_file in the client(Windows).
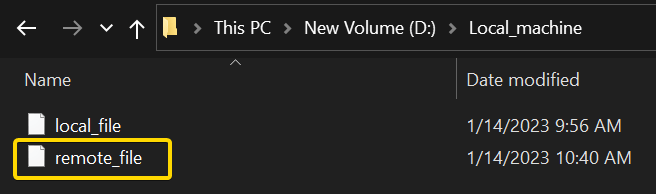
Example 9: Generating Public-Private Keys Using “ssh-keygen”
Communication is more secure using the ssh command in Linux. In ssh command, you can use public-private key pair to connect to a server apart from using a password. In this example, I will show to generate public and private keys using the “ssh-keygen” command. The “-f” option of this command is used to generate keys in a defined location. Follow the steps below with me:
Steps to Follow >
❶ Open Windows Powershell from the start menu.
❷ Write the following command in the command prompt and press ENTER:
ssh-keygen -f D:\Local_machine\mykey❸ Give a passphrase (it’s not mandatory) and hit ENTER
❹ Provide the passphrase again and press ENTER from the keyboard.
Output >
If you follow all the steps perfectly, you will see an output like below.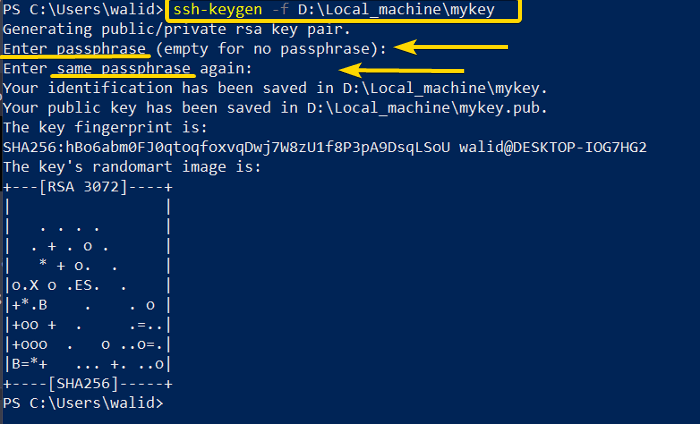 Also, as you can see, there are two keys generated in the defined location. The mykey file is the private key whereas mykey.pub is the public key.
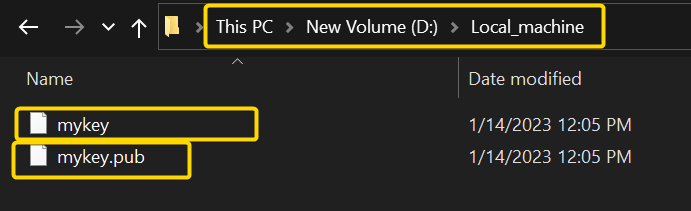
Similar Readings
- The “ftp” Command in Linux [14 Practical Examples]
- The “host” Command in Linux [10 Practical Examples]
- The “scp” Command in Linux [4 Practical Examples]
- The “sftp” Command in Linux [6 Practical Examples]
Example 10: Transfer Public Key File to Server
In the previous example, I generated two keys. The public key needs to be in the server and the private key in the client computer. Remember the location of the public key and private key can be anything you want. However, there is a default directory in Linux to store the public key named .ssh in the home directory and I will keep my public key there. The folder should be secured. To conserve every right to the owner (root user), write the following command in the Ubuntu Terminal:
chmod 700 ~/.sshMoreover, there is a command available to send the public key to the server in Linux. The command goes like below:
ssh-copy-id -i /path_of_the_public_key [email protected]Sadly, Windows Powershell doesn’t have any command like that. That’s why I will send the public key using scp. Now follow the steps with me:
Steps to Follow >
❶ Press Windows_key + R, write “powershell” and press ENTER to open Windows Powershell first
❷ Write the following command in the command prompt and press ENTER again:
scp D:\Local_machine\mykey.pub [email protected]:~/.ssh❸ Type “yes” and hit Enter. (if necessary)
❹ Provide the password and press ENTER from the keyboard.
❺ Delete the public key from the client now.
❻ Then launch an Ubuntu Terminal and copy the following command:
sudo service ssh restart❼ Press the ENTER button.
Output >
Here you are seeing the output in Windows Powershell. “100%” indicates the file is copied successfully.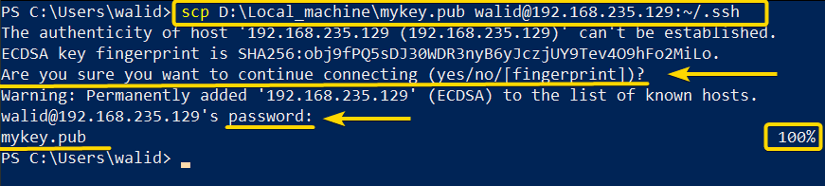 Here you can see, there is a new file name mykey.pub in the .ssh directory.
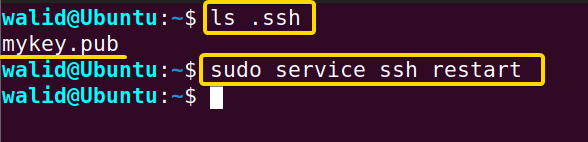 And here I am deleting the public key. Don’t forget to do that.
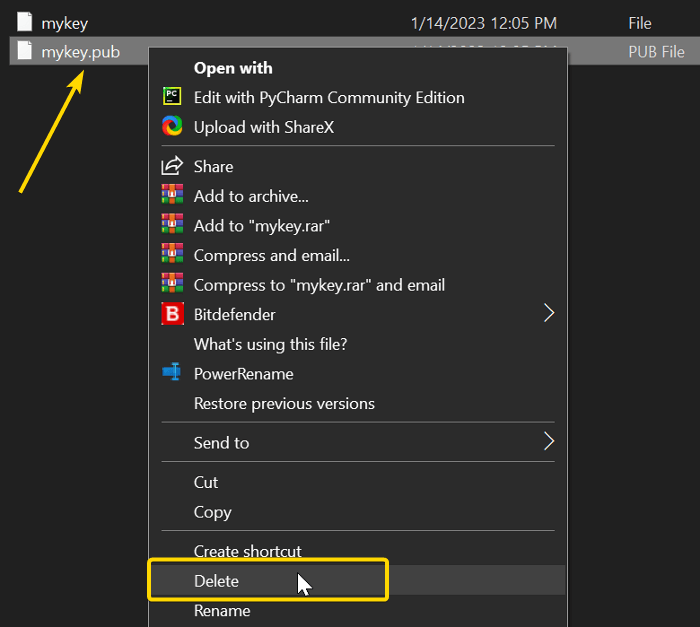
Example 11. Enable Key-based Authentication
If you want to log in using private-public key pair you need to enable it on the server. In this example, I will enable key-based authentication by editing the sshd_config file. Do the following:
Steps to Follow >
❶ Press CTRL + ALT + T to open an Ubuntu Terminal.
❷ Copy the following command in the Terminal and press ENTER:
sudo nano /etc/ssh/sshd_config❸ Find and edit or add the following line in the file:
PubkeyAuthentication yes❹ Press CTRL + O, then Y to save the file; CTRL + X to exit.
❺ Write the following command to restart ssh service:
sudo service ssh restart❻ Hit ENTER from the keyboard.
Output >
Here I have attached the image to show you how to edit the sshd_config file.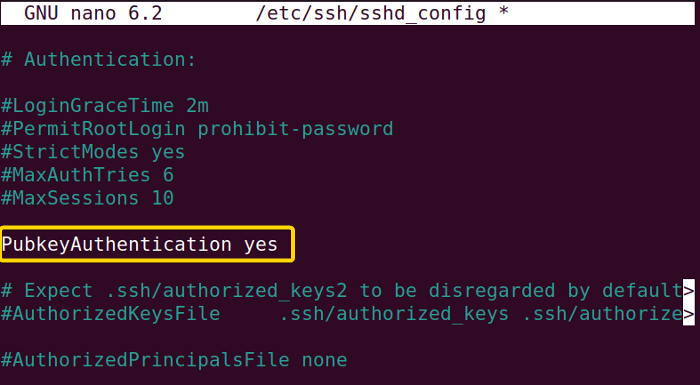 And, this image shows how to run the commands in the Terminal.
Example 12: Connect to Server with Public-Private Key Pair Using the “ssh” Command in Linux
Finally, now I will access the server with the public-private key pair using the ssh command in Linux. I will use the option “-i” to provide the path of the private key. Now follow the steps below with me:
Steps to Follow >
❶ Open Windows Powershell at first.
❷ Insert the following the command in command prompt and press ENTER:
ssh -i D:\Local_machine\mykey [email protected]❸ Provide the passphrase for key and hit ENTER again.
❹ Give the password and press ENTER from the keyboard.
Output >
Earlier, I used only password to log into the server. Now, as can see, I am using private and passphrase as well.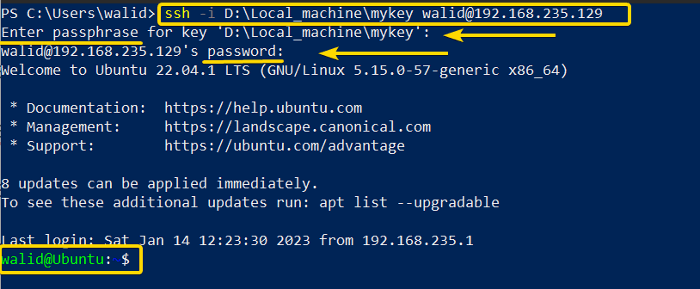
Example 13: Enable Only Key-based Authentication
What if you want to access a server by key pair? For this, you will need to edit the .sshd_config and turn off password-based authentication. You will also need to add the public key in the authorized_keys file. To d follow the steps below:
Steps to Follow >
❶ At first, launch the Ubuntu Terminal.
❷ Write the following command in the Terminal and press ENTER:
cat ~/.ssh/mykey.pub >> ~/.ssh/authorized_keys❸ Now, copy the command below in the command prompt and hit ENTER:
sudo nano /etc/ssh/sshd_config❹ Edit the file like below:
PubkeyAuthentication yes
AuthorizedKeysFile .ssh/authorized_keys
PasswordAuthentication no
ChallengeResponseAuthentication no
❺ Press CTRL + O, then Y to save the file; To exit press CTRL + X.
❻ Restart ssh service by typing the command below and pressing ENTER:
sudo service ssh restartOutput >
Here, you can see the screenshot of the command prompt. And here is how I edited the .sshd_config file. Remember sometimes you will find those lines in the file. You will just need to edit them. But at times, maybe you will need to add them by yourself.
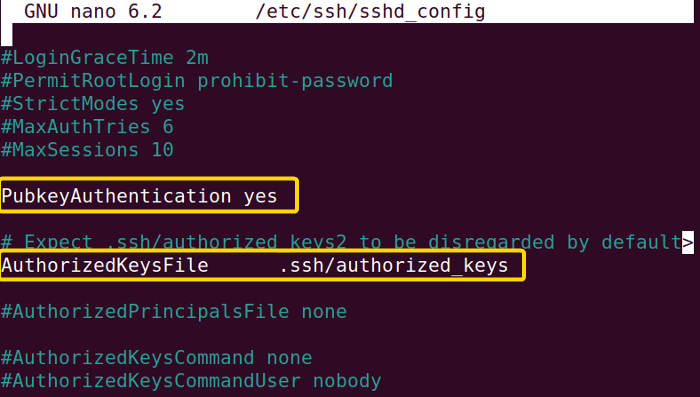 If you want to enable password-based authentication again, you will need to put the value “yes” for PasswordAuthentication.
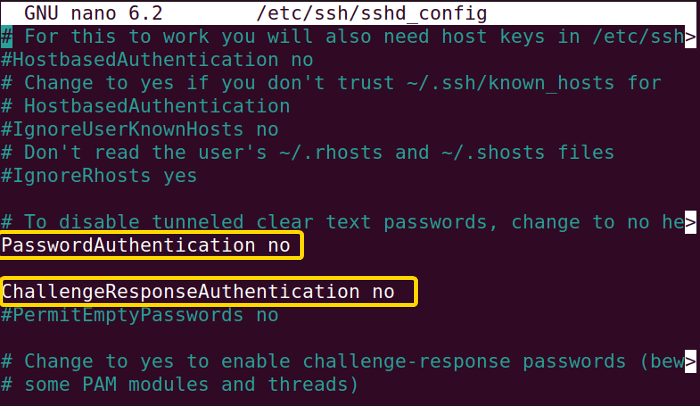 Now see, it is only asking for the passphrase for the key while logging into the server.
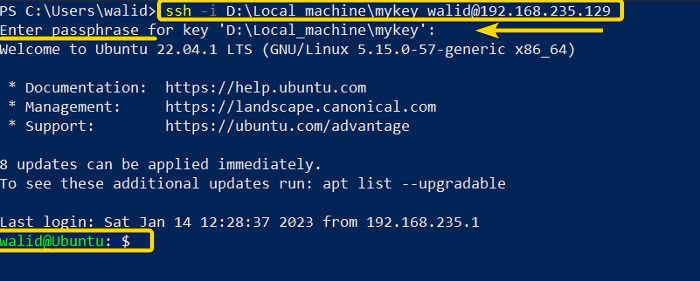
Example 14: Send Compressed Data Using the “ssh” Command in Linux
The ssh command in Linux provides an option to send compressed data. This can be useful while using a poor internet connection. you need to use the option “-C” for that purpose. Now do the following:
Steps to Follow >
❶ At first, open Windows Powershell.
❷ Copy the command below in the command prompt:
ssh -C [email protected]❸ Now press ENTER from the keyboard.
Output >
Login using the option “-C” is similar to a normal login. You need to provide the passphrase, password as usual.![]()
Example 15: Enable Verbose Mode in the “ssh” Command in Linux
The option “-v” in the ssh command in Linux is used to show detailed information while connecting to a server. This can be helpful if you want to figure out what is going wrong. And you can also decide to what depth, you want to get the information. You can use “-v” or “-vvv” for more information. Now follow the steps below with me:
Steps to Follow >
❶ Go to the start menu of your Windows OS and open PowerShell from there.
❷ Copy the following command in the Powershell:
sudo -v [email protected]❸ Press ENTER from your keyboard.
Output >
As you can see, every step of the connection process is listed one by one.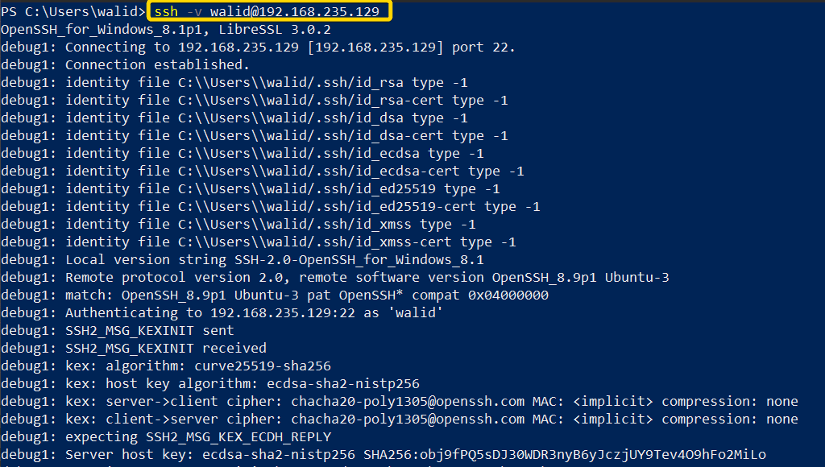
Similar Readings
- The “traceroute” Command in Linux [13 Practical Examples]
- The “rsync” Command in Linux [10 Practical Examples]
- The “screen” Command in Linux [13 Practical Examples]
- The “arp” Command in Linux [7 Practical Examples]
Example 16: Create a Banner Message
In this example, I will show you how to set up a banner message. The banner message is shown when someone tries to log into a server using the ssh command in Linux. You can use it to show a warning text. To show banner message you will need to edit the .sshd_config file. You can do that by following the steps below:
Steps to Follow >
❶ Press CTRL + ALT + T to launch an Ubuntu Terminal.
❷ Write the following command in the command prompt to create a file containing banner message:
echo “WELCOME TO OUR SERVER” >> banner_message❸ Use the command below to open .sshd_config file:
sudo nano /etc/ssh/sshd_config❹ Edit the .sshd_config file like the below:
Banner /home/walid/banner_message❺ Press CTRL + O and Y to save the file; press CTRL + X to exit.
❻ Now restart the ssh service by typing the command below:
sudo service ssh restart❼ Then press ENTER from the keyboard.
Output >
I have attached two images to help you with the process. The first image shows you how to run necessary commands in the command prompt. And the second image shows how to edit the .sshd_config file.
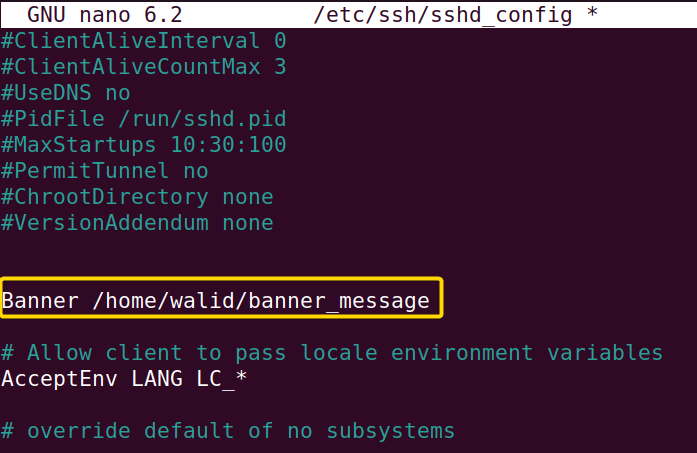 Now see, when I am trying to log into the server, it is showing the message “WELCOME TO OUR SERVER”.
Example 17: Disable Root Login
In this example, I will show you how to disable root login. It is a safety measure. To do that you need to edit the .sshd_config file and restart the ssh service as usual. You can do all those by following the steps below:
Steps to Follow >
❶ At first, open the Ubuntu Terminal.
❷ Write the following command in the Terminal:
sudo nano /etc/ssh/sshd_config❸ Now edit the file like below:
PermitRootLogin no❹ Save and exit the file at once by pressing CTRL + X and then ENTER.
❺ Then copy the following command and press ENTER:
sudo service ssh restartOutput >
In the first command in the image below, I opened the .sshd_config file and in the second one, I restarted ssh service.And, here I have shown you how to edit the file. Most of the time the line is already there. You just need to remove the hash (#) from the beginning.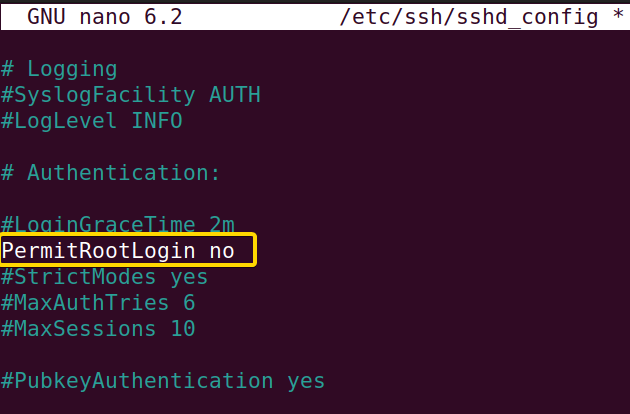 Here, I tried to log in as a root user and it is showing “Permission denied”.
Example 18: Remotely Access Your Server Using the “ssh” Command in Linux
Now I will show how you can access your server from a remote location. However, remember, exposing your server to the world may attract some unwanted attention. So, be careful.
Now, if I want to access my server, the server needs to have an IP address of its own. To do that I will set the network connection of my Ubuntu to Bridged instead of NAT from the VMWare Workstation settings. Finally, I will allow my Windows Firewall to communicate through port 22. I have explained all of them in simple steps, follow them with me:
Steps to Follow >
❶ Open your VMware Workstation.
❷ Click on your Ubuntu, then VM, and Settings.
❸ Then click on Network Adapter and set the Network Connection to Bridged.
❹ Now open Command Prompt from the start menu of your Windows OS as administrator.
❺ Copy the following command to add a new rule to allow connection through port 22 and press ENTER:
netsh advfirewall firewall add rule name="OpenSSH" dir=in action=allow protocol=TCP localport=22❻ (Optional) To delete the rule anytime, copy the following command and hit ENTER:
netsh advfirewall firewall delete rule name="OpenSSH" protocol=TCP dir=in localport=22Output >
Here I have added some screenshots to help you better understand the process. At first, I opened the corresponding settings of my Ubuntu (sever).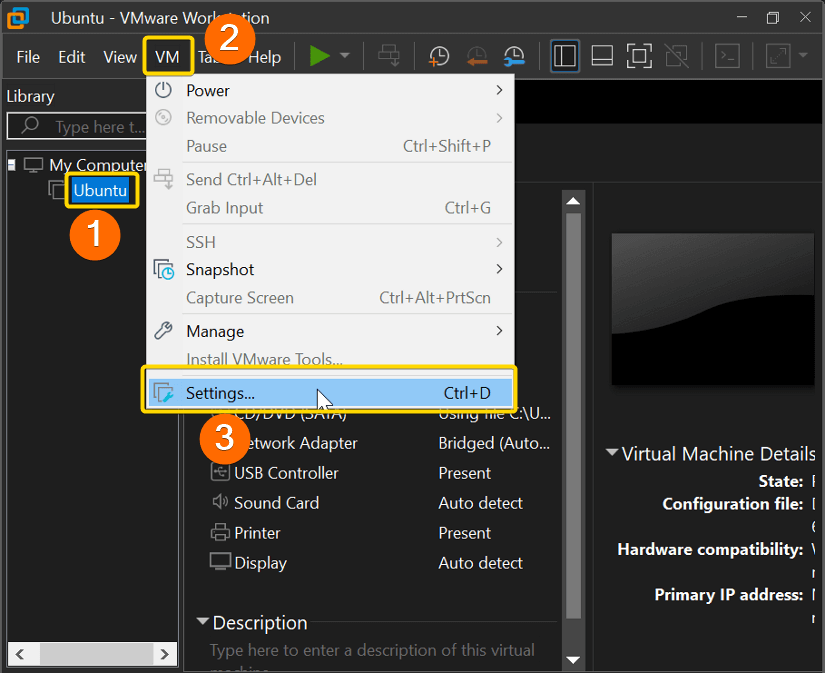 Then I clicked on Network Adapter and make the connection Bridged.
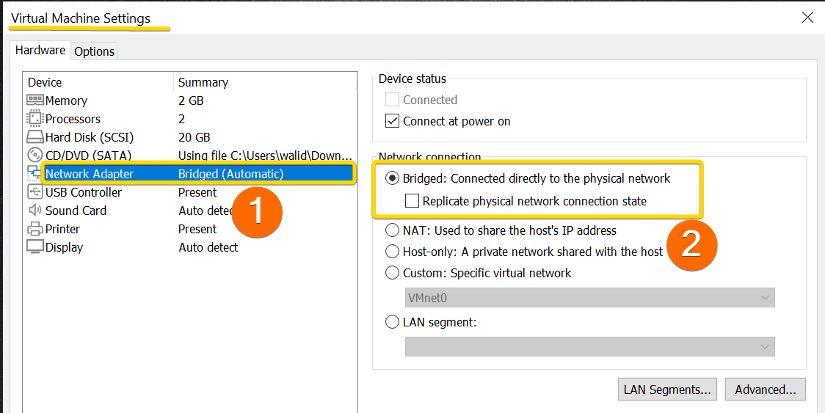 Here I opened the Command Prompt as “Run as administrator” and wrote the command of step 6 to add a new Inbound Rule.
 I also attached this image so that you can remove the “OpenSSH” rule without any hassle.
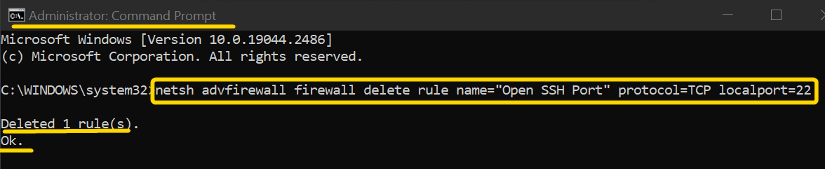 To demonstrate that remote communication is actually working, I used my friend’s computer. And see, I logged into my server!
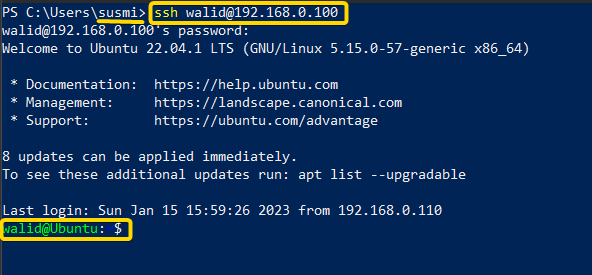
Conclusion
The ssh command in Linux is very important if you are interested in networking. Also, you can use it in your regular life as well. If you find it difficult to grasp at first, don’t worry. I hope practicing all the examples above will help you understand the ssh command in Linux better.
Similar Readings
- The “wget” Command in Linux [14 Practical Examples]
- The “ping” Command in Linux [9 Practical Examples]
- The “curl” Command in Linux [9 Practical Examples]
- The “ dig” Command in Linux [10 Practical Examples]
- The “hostname” Command in Linux [12 Practical Examples]
- The “ip” Command in Linux [9+ Practical Examples]
- The “ifconfig” Command in Linux [6+ Practical Examples]
FUNDAMENTALS A Complete Guide for Beginners


