Bash is a popular built-in shell in the Unix-like operating system. And hash is the built-in command within the shell that maintains the bash path hash which is actually a hash table. By running a hash command, one can force the hash table to execute all the commands in subsequent invocations rather than the entire system’s directory search. In this guide, I will demonstrate the functionalities of the hash command on Linux within a hash table.
Key Takeaways
- Learning about the hash command in Bash.
- Learning about the syntax and return values of hash commands.
- Getting ideas about various executions on a hash table.
Applications
- For viewing hash table entries and command lookup.
- For refreshing the hash table to make the shell understand the changes.
- For forcing the shell to look for a command in the path.
- For clearing the hash table.
What is “hash” in Bash?
Hash is a built-in command in the Bash shell. It plays a significant role in managing the hash table and boosting the command execution speed. The hash command displays the contents of the hash table, records the commands path, and reveals the cached commands’ path avoiding the full directory search.
The basic syntax for the hash command:
hash [option] [command] Useful Options
There are several options that can be used in hash syntax. They are:
- l (List): Displays a list of information that can be reused as input for another program.
- r (Reset): Removes all entries and clears the hash table.
- p (Pathname): Allows adding or modifying entries in the hash table with a full pathname.
- t (Type): Displays the location of the specific commands.
- d (Delete): Removes the remembered locations of each command in the hash table.
- command: It is an optional argument to limit the options only to the mentioned ones.
Why Bash the “hash” Command?
The hash command accelerates the command execution within the bash shell. Here is why you should use bash the hash command:
- To speed up command execution.
- To reduce disk I/O operations.
- To display the command path.
- To manage the hash table.
- To improve user experience.
Exit Status
The return values of hash commands are usually checked only when you are using them in a script. Here are the return values of the hash:
| Value | Description |
|---|---|
| 0 | Successful execution |
| Otherwise | Command not found, an error occurred |
You can access the return values provided by the hash command through ‘$?’, a special shell variable just after execution like the following:
hash <command>
echo $?- hash <command>: Execute the hash command with your desired command.
- echo: Display the value of $?.
- $?: Holds the exit status of the most recent command. Here, the recently used command is the ‘hash’ command.
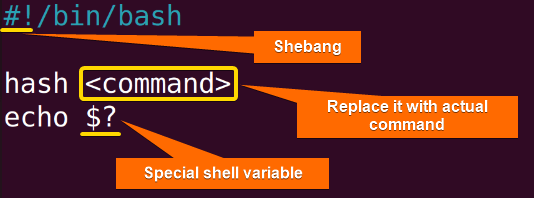 The above image represents the execution of the hash command with a special shell variable for accessing return values.
Practical Examples of “hash” command in Linux
Hash tables have versatile implementations. You can display, list up, add, delete contents, and more within the hash table. Below I am going to share some execution of the hash table in Linux:
Example 1: Displaying the Hash Table Using the “hash” Command
If you want to display the hash table, follow the steps below accordingly:
Steps to Follow >
❶ At First, open your Ubuntu terminal.
❷ Write the following command to show the hash table:
hash- hash: The hash command without any argument displays the lists of commands in the hash table with their full pathname.
You will see an output like the following image: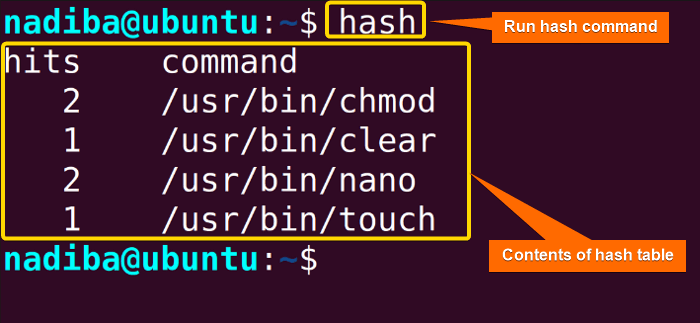
 The image shows that the hash table is empty.
Example 2: Listing the contents of the Hash Table Using the “hash” Command
Use the following command in the terminal to display the list of currently hashed commands that can be used as input for another program:
hash -l- hash -l: Displays the lists of commands in the hash table.
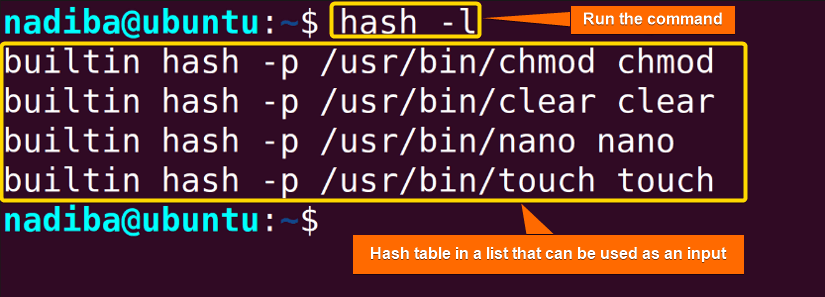 You can see the list of the hash table in the above image.
Example 3: Showing the Location of Commands Using the “hash” Command
To display the location of a command hashed currently, open your Ubuntu terminal & write the command below:
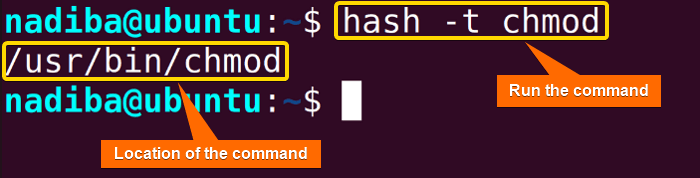
hash -t chmod- hash -t: Displays the location of the currently hashed command.
- chmod: The command for which you want to display the full location. Here, I have used the command ‘chmod’.
 To display the location of multiple commands write the following command:
hash -t chmod nano- chmod nano: Separate the commands by the spaces you want to list up. Here, I have listed up two commands ‘chmod’ and ‘nano’.
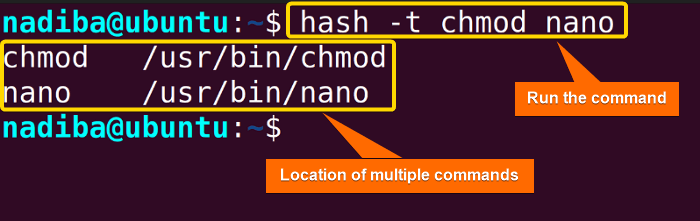 From the image, you can see the locations of two commands ‘chmod’ and ‘nano’.
- The “alias” Command in Linux [3 Practical Examples]
- The “unalias” Command in Linux [3 Practical Examples]
- The “exit” Command in Linux [5 Practical Examples]
Example 4: Adding & Naming Command Path Using the “hash” Command
Use the command option ‘-p’ to add a command to the hash table. For that, write the following command on your command prompt:
hash -p /home/hash.sh bash- hash -p: Adds or modifies new entries with a specific pathname.
- /home/hash.sh bash: Specific path for the added content in the hash table with a name. Here, I have added ‘/home/hash.sh’ script in the hash table and named it ‘bash’.
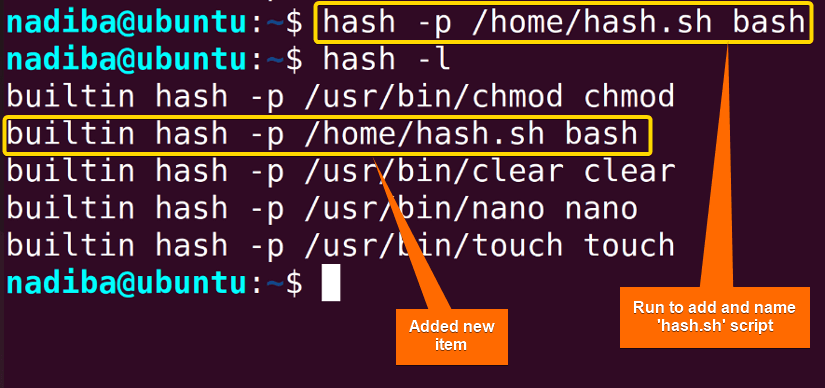 By running the ‘hash -l’ command you can check if the new item has been added or not like in the snapshot above.
Example 5: Deleting Items From Hash Table Using the “hash” Command
To delete an item from the hash table, write the following command in the terminal:
hash -d command- hash -d: Deletes a hashed item from the hash table.
- command: The item you want to remove from the hash table. Here, I have deleted the item ‘/usr/bin/clear’.
 Subsequently, run ‘hash -l’ to see the current list of items in the hash table. And from the above image you can see that after executing the delete operation on the ‘/usr/bin/clear’ item, it is no longer in the list of recently hashed commands.
Example 6: Clearing the Hash Table Using the “hash” Command
After checking all items in the hash table, you can fully clear the hash table by running the command below in the command prompt:
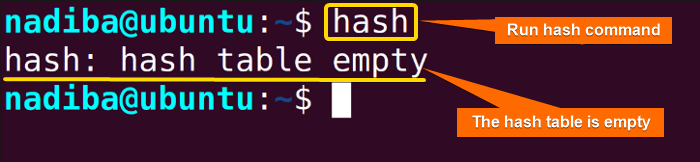
hash -r- hash -r: Removes all items and clears the hash table.
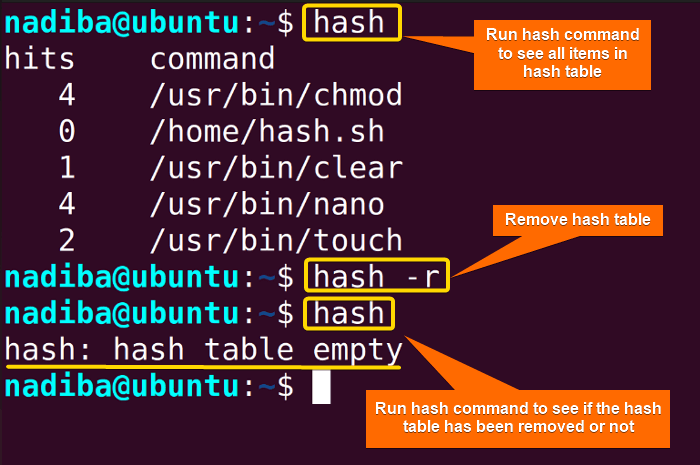 Check if the hash table has successfully been removed or not by running the command ‘hash’ once again. If it is done properly, you will see the output message ‘hash: hash table empty’ like the above image.
Conclusion
Wrapping up the whole guide you will get the key points of the ‘hash’ command in Linux that helps optimize the track of executed commands and boost up the speed and response time.
People Also Ask
Related Articles
- The “bash” Command in Linux [5 Practical Examples]
- The “clear” Command in Linux [3 Practical Examples]
- The “declare” Command in Linux [7 Practical Examples]
- The “export” Command in Linux [8 Practical Examples]
- The “source” Command in Linux [3 Practical Examples]
- The “echo” Command in Linux [7 Practical Examples]
- The “read” Command in Linux [8 Practical Examples]
- The “set” Command in Linux [6 Practical Examples]
- The “unset” Command in Linux [2 Practical Examples]
- The “eval” Command in Linux [4 Practical Examples]
FUNDAMENTALS A Complete Guide for Beginners


