Publishing Extensions
Once you have made a high-quality extension, you can publish it to the VS Code Extension Marketplace so others can find, download, and use your extension. Alternatively, you can package an extension into the installable VSIX format and share it with other users.
This topic covers:
- Using vsce, the CLI tool for managing VS Code extensions
- Packaging, publishing and unpublishing extensions
- Registering a publisher necessary for publishing extensions
vsce
vsce, short for "Visual Studio Code Extensions", is a command-line tool for packaging, publishing and managing VS Code extensions.
Installation
Make sure you have Node.js installed. Then run:
npm install -g @vscode/vsce
Usage
You can use vsce to easily package and publish your extensions:
$ cd myExtension
$ vsce package
# myExtension.vsix generated
$ vsce publish
# <publisher id>.myExtension published to VS Code Marketplace
vsce can also search, retrieve metadata, and unpublish extensions. For a reference on all the available vsce commands, run vsce --help.
Publishing extensions
Due to security concerns, vsce will not publish extensions that contain user-provided SVG images.
The publishing tool checks the following constraints:
- The icon provided in
package.jsonmay not be an SVG. - The badges provided in the
package.jsonmay not be SVGs unless they are from trusted badge providers. - Image URLs in
README.mdandCHANGELOG.mdneed to resolve tohttpsURLs. - Images in
README.mdandCHANGELOG.mdmay not be SVGs unless they are from trusted badge providers.
Visual Studio Code uses Azure DevOps for its Marketplace services. This means that authentication, hosting, and management of extensions are provided through Azure DevOps.
vsce can only publish extensions using Personal Access Tokens. You need to create at least one in order to publish an extension.
Get a Personal Access Token
First off, follow the documentation to create your own organization in Azure DevOps. In the following examples, the organization's name is vscode, you should use your new organization name as appropriate. Note that the organization's name doesn't necessarily have to be same as your publisher name.
-
From your organization's home page (for example:
https://dev.azure.com/vscode), open the User settings dropdown menu next to your profile image and select Personal access tokens:
-
On the Personal Access Tokens page, select New Token:

-
In the Create a new personal access token modal, select the following details for the token:
- Name: any name you want for the token
- Organization: All accessible organizations
- Expiration (optional): set the desired expiration date for the token
- Scopes: Custom defined:
- click Show all scopes link below the Scopes section
- in the Scopes list, scroll to Marketplace and select Manage scope

-
Click Create.
You'll be presented with your newly created Personal Access Token. Copy it to the safe location, you'll need it to create a publisher.
Create a publisher
A publisher is an identity that can publish extensions to the Visual Studio Code Marketplace. Every extension needs to include a publisher identifier in its package.json file.
To create a publisher:
-
Go to the Visual Studio Marketplace publisher management page.
-
Log in with the same Microsoft account you used to create the Personal Access Token in the previous section.
-
Click Create publisher in the pane on the left.
-
In the new page, specify the mandatory parameters for a new publisher - identifier and name (ID and Name fields respectively):
- ID: the unique identifier for your publisher in Marketplace that will be used in your extension URLs. ID cannot be changed once created.
- Name: the unique name of your publisher that will be displayed in Marketplace with your extensions. This can be your company or brand name.
Below is an example of publisher identifier and name for the Python extension:

-
Optionally, fill out the rest of the fields.
-
Click Create
-
Verify the newly created publisher using
vsce. In your terminal, run the following command, and when prompted, type the Personal Access Token created in the previous step:vsce login <publisher id> https://marketplace.visualstudio.com/manage/publishers/ Personal Access Token for publisher '<publisher id>': **************************************************** The Personal Access Token verification succeeded for the publisher '<publisher id>'.
Once verified, you are ready to publish an extension.
Publish an extension
You can publish an extension in two ways:
-
Automatically, using
vsce publishcommand:vsce publishIf you haven't already provided your personal access token with the
vsce logincommand above,vscewill ask for it. -
Manually, using
vsce packageto package the extension into the installable VSIX format and then uploading it to the Visual Studio Marketplace publisher management page:
Review extension installs and ratings
The Visual Studio Marketplace publisher management page gives you access to each extension's Acquisition Trend over time, as well as Total Acquisition counts and Ratings & Reviews. To see the reports, click an extension or choose More Actions > Reports.

Auto-increment the extension version
When publishing an extension, you can auto-increment its version number by specifying the SemVer-compatible number or version (major, minor, or patch) to increment. For example, to update an extension's version from 1.0.0 to 1.1.0, you would specify:
vsce publish minor
or
vsce publish 1.1.0
Both commands will first modify the extension's package.json version attribute and then publish it with the updated version.
If you run vsce publish in a git repo, it will also create a version commit and tag via npm-version. The default commit message will be the extension's version, but you can supply a custom commit message using the -m flag. (The current version can be referenced from the commit message with %s).
Unpublishing extensions
You can unpublish an extension from the Visual Studio Marketplace publisher management page by clicking More Actions > Unpublish:
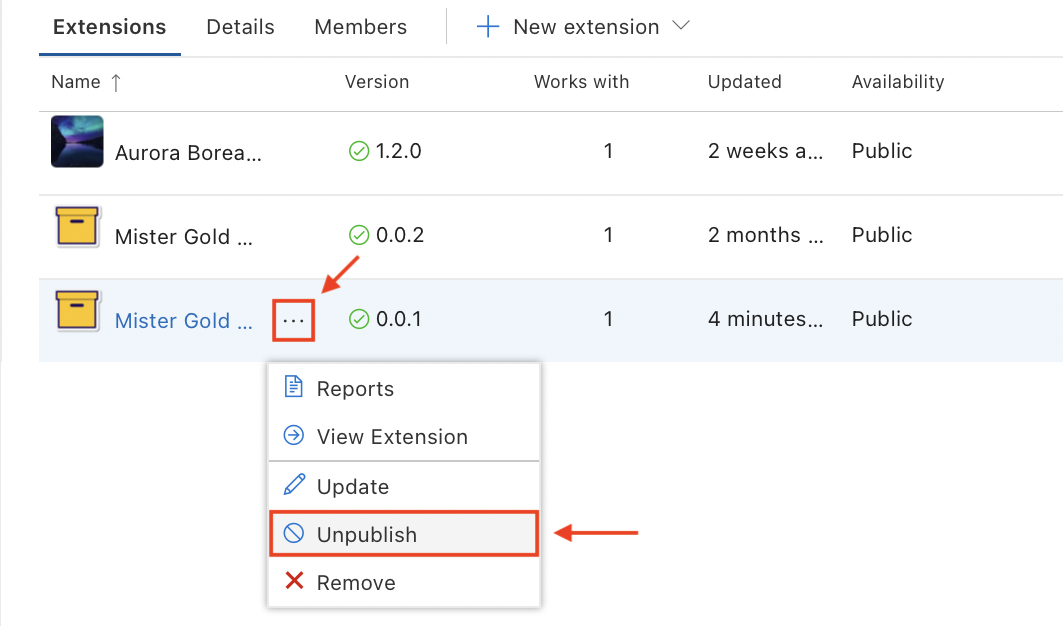
Once unpublished, the extension's Availability status is changed to Unpublished and it will no longer be available for download from both the Marketplace and Visual Studio Code:

When you unpublish an extension, the Marketplace preserves the extension statistics.
Removing extensions
You can remove an extension in two ways:
-
Automatically, using
vscewith theunpublishcommand:vsce unpublish <publisher id>.<extension name> -
Manually, from the Visual Studio Marketplace publisher management page by clicking More Actions > Remove:

In both cases, you will be prompted to confirm the removal by typing the extension name. Note that the removal action is irreversible.
When you remove an extension, the Marketplace also removes any extension statistics. You may want to unpublish your extension rather than remove it.
Deprecating extensions
You can just deprecate an extension or deprecate in favor of another extension or a setting. The deprecated extension will be rendered with a dimmed strike-through text in the UI:

Each deprecated extension has a yellow warning icon in the bottom right corner of the extension tile (see the screenshot above). When hovering over the extension tile, you can see deprecation details next to this icon, whether:
-
The extension was deprecated without any alternatives:

-
The extension was deprecated in favor of another extension:

-
The extension was deprecated in favor of a setting:

VS Code will not automatically migrate or uninstall already installed deprecated extensions. If a deprecated extension has an alternative extension, or a setting, VS Code will show a Migrate button to help you quickly switch to the specified alternative:

To mark your extension as deprecated, please leave a comment in the Deprecated extensions discussion thread.
For now, extensions are not rendered as deprecated in the Marketplace. This functionality will be available later.
Packaging extensions
You can choose to package your extension if you want to:
- Test it on your VS Code instance.
- Distribute it without publishing it to the Marketplace.
- Share it with others privately.
Packaging means creating a .vsix file that contains your extension. This file can then be installed in VS Code. Some extensions publish .vsix files as a part of their GitHub releases.
To package an extension, run the following command in your extension's root folder:
vsce package
This command creates a .vsix file in your extension's root folder. For example, my-extension-0.0.1.vsix.
For users, to install a .vsix file in VS Code:
-
From the Extensions view in VS Code:
- Go to the Extensions view.
- Select Views and More Actions...
- Select Install from VSIX...
-
From the command line:
# if you use VS Code
code --install-extension my-extension-0.0.1.vsix

# if you use VS Code Insiders
code-insiders --install-extension my-extension-0.0.1.vsix
Your extension folder
To load an extension, you need to copy the files to your VS Code extensions folder .vscode/extensions. Depending on your operating system, this folder has a different location:
- Windows:
%USERPROFILE%\.vscode\extensions - macOS:
~/.vscode/extensions - Linux:
~/.vscode/extensions
Visual Studio Code compatibility
When authoring an extension, you must specify the versions of VS Code your extension is compatible with. To do this, use the engines.vscode property inside package.json:
{
  "engines": {
    "vscode": "^1.8.0"
  }
}
- A value of
1.8.0(without caret) means that your extension is compatible only with VS Code1.8.0. - A value of
^1.8.0means that your extension is compatible with VS Code1.8.0and onwards, including1.8.1,1.9.0, etc.
You can use the engines.vscode property to ensure the extension only gets installed for clients that contain the API you depend on. This mechanism plays well both with Stable and Insiders releases.
For example, imagine that the latest Stable version of VS Code is 1.8.0. During the development of version 1.9.0, a new API was introduced and made available in the Insider release through the version 1.9.0-insider. If you want to publish an extension version that benefits from this API, you should indicate a version dependency of ^1.9.0. In this way, your new extension version will only be available on VS Code >=1.9.0 (in other words, users with the current Insiders release). Users with the VS Code Stable will only get the update when the Stable release reaches version 1.9.0.
Advanced usage
Marketplace integration
You can customize how your extension looks in the Visual Studio Marketplace. See the Go extension for an example.
Here are some tips for making your extension look great on the Marketplace:
-
Add a
README.mdfile to the root of your extension with the content you want to show on the extension's Marketplace page.NoteIf you have a
repositoryproperty in yourpackage.jsonthat points to a public GitHub repository,vscewill automatically detect it and adjust relative links accordingly, using themainbranch by default. You can override this with the--githubBranchflag when runningvsce packageorvsce publish. You can also set base URLs for links and images with the--baseContentUrland--baseImagesUrlflags. -
Add a
LICENSEfile to the root of your extension with the information about the extension's license. -
Add a
CHANGELOG.mdfile to the root of your extension with the information about the history of the changes for your extension. -
Add a
SUPPORT.mdfile to the root of your extension with the information about how to get support for your extension. -
Set the banner background color on the Marketplace page by specifying the corresponding hex value via the
galleryBanner.colorproperty inpackage.json. -
Set an icon by specifying a relative path to a PNG file of at least 128x128px included in your extension via the
iconproperty inpackage.json.
See more information in Marketplace Presentation Tips.
Verify a publisher
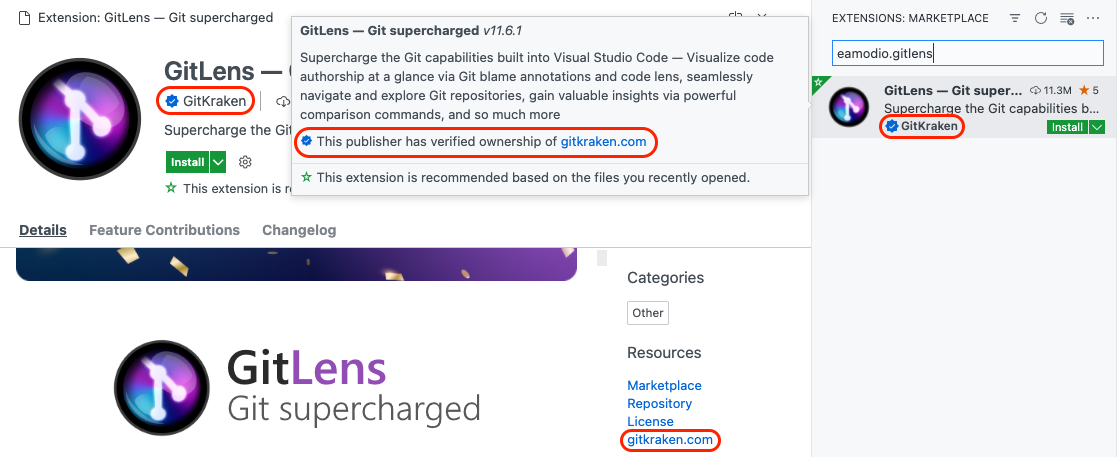
You can become a verified publisher by verifying ownership of an eligible domain associated with your brand or identity. Once your publisher is verified, the Marketplace will add a verified badge to your extension details.
Prerequisites
To become verified, a publisher must have one or more extensions on the VS Marketplace for a minimum of 6 months, and the registration of the domain must also be at least 6 months old. Please wait until these criteria are met before applying for verification.
To verify a publisher:
-
Go to the Visual Studio Marketplace publisher management page.
-
In the pane on the left, select or create a publisher you wish to verify.
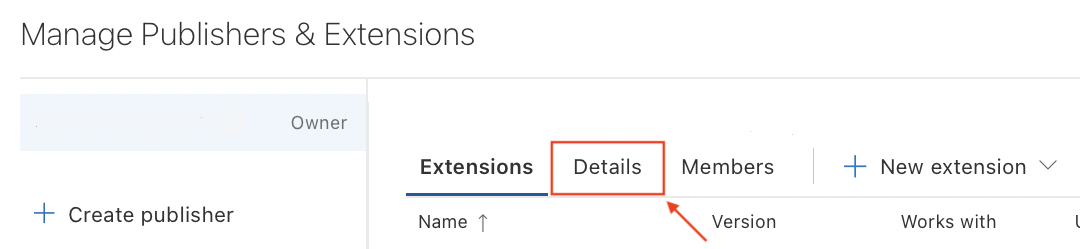
-
In the main pane, select the Details tab.
-
In the Details tab, under the Verified domain section, type an eligible domain.
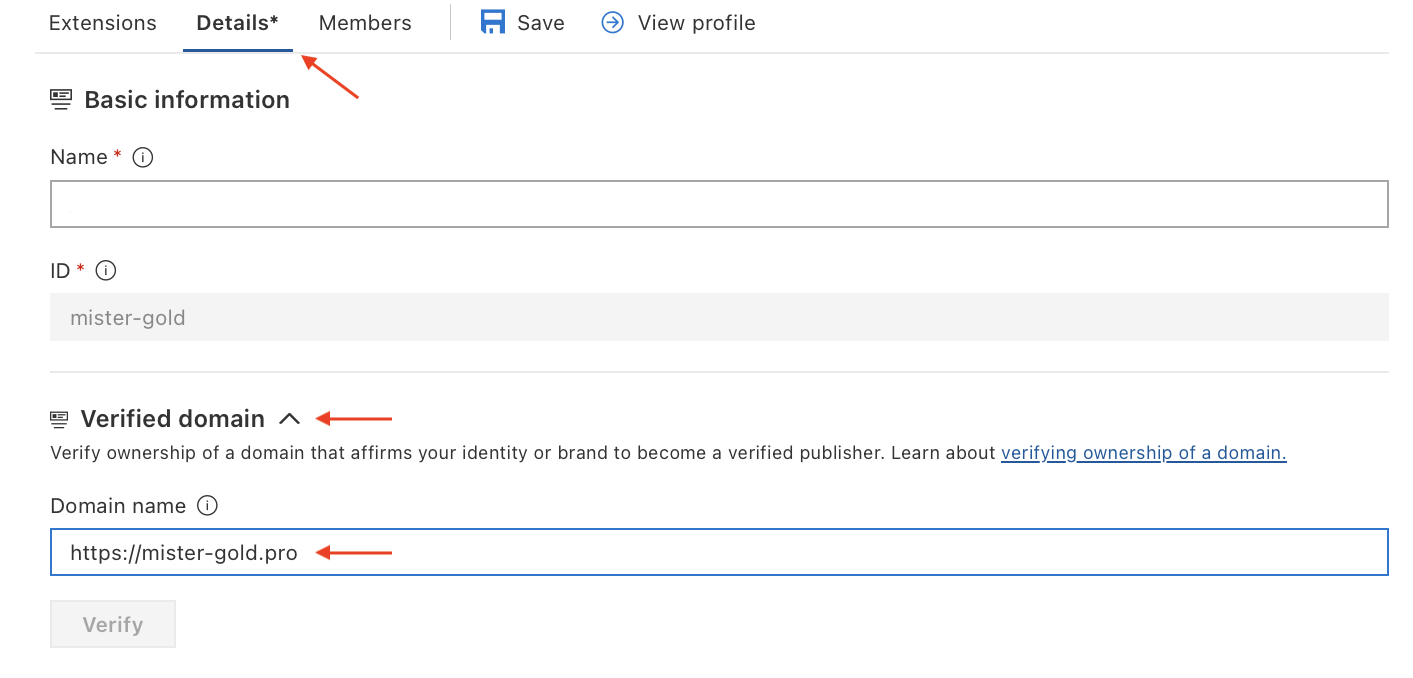
Note: Notice an asterisk (*) next to Details tab title after you start typing. Just like in VS Code, this indicates that you have unsaved changes. For the same reason, the Verify button is disabled yet.
-
Select Save and then Verify.

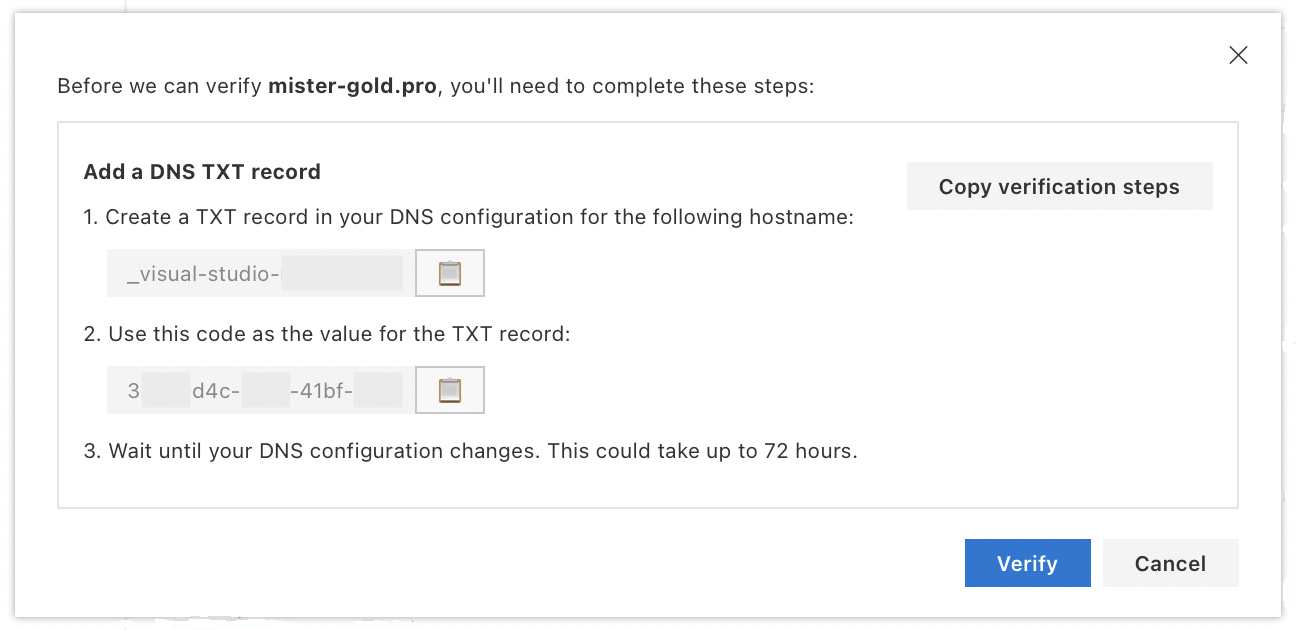
A dialog window will appear, providing you with instructions about adding a TXT record to your domain's DNS configuration.
-
Follow the instructions to add the TXT record to your domain's DNS configuration.
-
Select Verify in the dialog window to validate that the TXT record has been successfully added.

Once your TXT record has been validated, the Marketplace team will review your request and let you know the result within 5 business days. The validation includes, but is not limited to: domain, website and extensions prerequisites for track record, content eligibility, legitimacy, trust and positive reputation.
If validation is passed, you will see the corresponding badge next to your publisher name in the Visual Studio Marketplace publisher management page:

Notes:
- Any changes to the publisher display name will revoke the verified badge.
- Any future Terms of Use or above mentioned validation violations from the publisher will revoke the verified badge.
Eligible domains
Eligible domains meet the following criteria:
- You must be able to manage the DNS configuration settings and add a TXT record.
- It is not a subdomain ({subdomain}.github.io, {subdomain}.contoso.com, or similar).
- It must use an HTTPS protocol.
- It must be able to respond with an HTTP 200 status to a HEAD request.
Extension pricing label
You can opt-in to show a pricing label on your extension's Marketplace page to indicate that it is Free or Free Trial.
To show a pricing label, add the pricing property to your package.json. For example:
{
  "pricing": "Free"
}
Allowed values are: Free and Trial (case-sensitive). When the pricing property is not specified, the default value is Free.
Make sure to use the vsce version >= 2.10.0 when publishing your extension for the pricing label to work.
Extension Sponsor
You can opt-in to sponsorship to give your users a way to support your work.
To show a sponsor link, add the sponsor property to your package.json. For example:
"sponsor": {
  "url": "https://github.com/sponsors/nvaccess"
}
Make sure to use the vsce version >= 2.9.1 when publishing your extension for sponsorship to work.
The sponsor link will appear on your extension's page in Marketplace and VS Code in the extension details header:
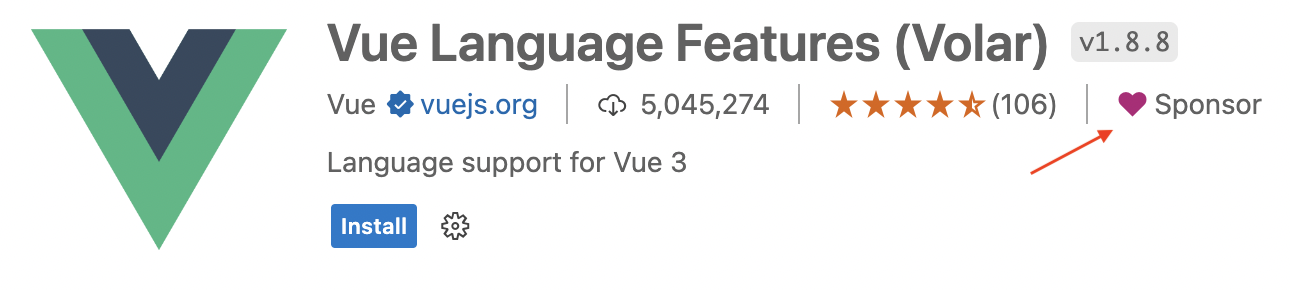
We hope this will allow our users to fund the extensions that they depend on to improve the extension's performance, reliability, and stability.
Using .vscodeignore
You can create a .vscodeignore file to prevent some files from being included in your extension's package. This file is a collection of glob patterns, one per line. For example:
**/*.ts
**/tsconfig.json
!file.ts
You should ignore all files not needed at runtime. For example, if your extension is written in TypeScript, you should ignore all **/*.ts files, like in the example above.
Development dependencies listed in devDependencies will be automatically ignored, so you don't need to add them explicitly.
Pre-publish step
You can add a pre-publish step to your manifest file, which will be called every time the extension is packaged. For example, you may want to invoke the TypeScript compiler at this stage:
{
  "name": "uuid",
  "version": "0.0.1",
  "publisher": "someone",
  "engines": {
    "vscode": "0.10.x"
  },
  "scripts": {
    "vscode:prepublish": "tsc"
  }
}
Pre-release extensions
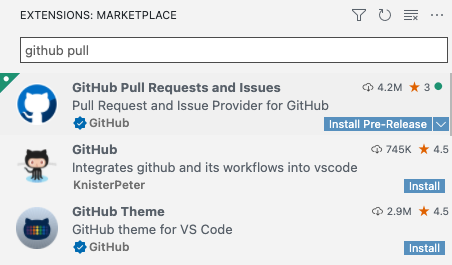
Users can install pre-release versions of extensions in VS Code or VS Code Insiders to regularly get the latest extension version before the official extension release.
To publish a pre-release version, pass the --pre-release flag to the vsce package or vsce publish commands:
vsce package --pre-release
vsce publish --pre-release
We only support major.minor.patch for extension versions, semver pre-release tags are not supported. Versions must be different between pre-release and regular releases. That is, if 1.2.3 is uploaded as a pre-release, the next regular release must be uploaded with a distinct version, such as 1.2.4. Full semver support will be available in the future.
VS Code will automatically update extensions to the highest version available, so even if a user opted-into a pre-release version and there is an extension release with a higher version, the user will be updated to the released version. So, we recommend that extensions use major.EVEN_NUMBER.patch for release versions and major.ODD_NUMBER.patch for pre-release versions. For example: 0.2.* for release and 0.3.* for pre-release.
If extension authors do not want their pre-release users to be updated to the release version, we recommend always incrementing and publishing a new pre-release version before publishing a release version to make sure that the pre-release version is always higher. Note that while pre-release users will be updated to a release version if it is higher, they still remain eligible to automatically update to future pre-releases with higher version numbers than the release version.
Pre-release extensions are supported after VS Code version 1.63.0, so all pre-release extensions should have the engines.vscode value in their package.json set to >= 1.63.0.
Extensions that already have a separate standalone pre-release extension should reach out to the VS Code team to enable the automatic uninstall of the outdated separate extension and install the pre-release version of the main extension.
Platform-specific extensions
You can publish your extension's VSIX package for each platform (Windows, Linux, macOS) VS Code is running on. We call such extensions platform-specific.
Starting with version 1.61.0, VS Code looks for the extension package that matches the current platform.
Platform-specific extensions are useful if your extension has platform-specific libraries or dependencies, so you can control the exact binaries that are included in a platform package. A common use case is the use of native node modules.
Platform-specific extensions are published as separate packages containing platform-specific content. You can specify the target platform by passing the --target flag. If you don't pass this flag, that package will be used as a fallback for all platforms that have no platform-specific package.
The currently available platforms are: win32-x64, win32-arm64, linux-x64, linux-arm64, linux-armhf, alpine-x64, alpine-arm64, darwin-x64, darwin-arm64 and web.
If you want a platform-specific extension to also support running in the browser as a web extension, it must target the web platform when publishing. The web platform respects the browser entry point in the package.json. To disable the extension capabilities that are not supported in the web, we recommend using when clauses in the package.json instead of shipping separate package.json for the web platform or removing parts of the VSIX that do not work in the web.
Publishing
Starting from version 1.99.0, vsce supports a --target parameter that allows you to specify the target platform while packaging and publishing a VSIX.
Here's how you can publish a VSIX for the win32-x64 and win32-arm64 platforms:
vsce publish --target win32-x64 win32-arm64
Alternatively, you can also use the --target flag when packaging to create a platform-specific VSIX. For example, to package a VSIX for the win32-x64 platform and then publish it:
vsce package --target win32-x64
vsce publish --packagePath PATH_TO_WIN32X64_VSIX
Continuous integration
Managing multiple platform-specific VSIXs might get overwhelming, so we suggest automating your extension's build process with continuous integration (CI) tooling. For example, you can use GitHub Actions to build your extensions. Our platform-specific extension sample can be used as a starting point for learning: its workflow enables the common scenario of using platform-specific extension support to distribute native node modules as dependencies across all supported VS Code targets.
Next steps
- Extension Marketplace - Learn more about VS Code's public Extension Marketplace.
- Testing Extensions - Add tests to your extension project to ensure high quality.
- Bundling Extensions - Improve load times by bundling your extension files with webpack.
Common questions
I get a "You exceeded the number of allowed tags of 30" error when I try to publish my extension?
The Visual Studio Marketplace does not allow an extension package to have more than 30 keywords in the package.json. Limit the number of keywords/tags to maximum 30 to avoid this error.
I get 403 Forbidden (or 401 Unauthorized) error when I try to publish my extension?
One easy mistake to make when creating the PAT (Personal Access Token) is to select a specific organization instead of All accessible organizations in the Organizations field dropdown. Another possible mistake is incorrect scope - you should set the Authorized Scopes to Marketplace (Manage) for the publish to work.
I can't unpublish my extension through the vsce tool?
You may have changed your extension ID or publisher ID. You can also manage your extensions directly via the Visual Studio Marketplace publisher management page. For example, update or unpublish.
Why does vsce not preserve file attributes?
Note that when building and publishing your extension from Windows, all the files included in the extension package will lack POSIX file attributes, namely the executable bit. Some node_modules dependencies rely on those attributes to function properly. Publishing from Linux and macOS works as expected.
Can I publish from a continuous integration (CI) build?
Yes, see the Automated publishing section of the Continuous Integration topic to learn how to configure Azure DevOps, GitHub Actions, and GitLab CI to automatically publish your extension to the Marketplace.
I get "ERROR The extension 'name' already exists in the Marketplace" error when I try to publish my extension?
The Marketplace requires the extension name to be unique for every extension. If an extension with the same name already exists in the Marketplace, you will get the following error:
ERROR The extension 'name' already exists in the Marketplace.
The same rule applies for the display name of an extension.
What package managers are supported?
You can either use npm or yarn v1 to manage your extension's dependencies.
I need help with my VS Marketplace account or support in publishing an extension?
You can reach out to the VS Marketplace support team by signing in at Manage Publishers & Extensions and clicking on the ‘Contact Microsoft’ link at the top right.