
User authentication and access#
Authentication providers#
Users can prove who they are by logging in via an authentication provider. Currently, the following providers are supported:
CILogon#
An extremely popular provider for various institutional logins, Google accounts (including @gmail.com accounts), Microsoft accounts, etc. This is our primary authentication provider. It can support allowing users from multiple institutions to login as well, which is very helpful. 2i2c can manage CILogon using the JupyterHub CILogonOAuthenticator.
Some key terms about CILogon authentication worth mentioning:
Identity ProviderThe authentication service available through the CILogon connection.
When a user logs in via CILogon, they are first presented with a list of various institutions and organizations that they may choose from (
Australia National University,UC Berkeley, etc.).The available identity providers are members of InCommon, a federation of universities and other organizations that provide single sign-on access to various resources.
Note
Check if a community’s login provider is available on CILogon, by going to https://cilogon.org/idplist and filter after its name.
User accountWithin an institution, each user is expected to have their own user account (e.g.
myname@berkeley.edu). This is the account that is used to give somebody an ID on their JupyterHub. This is entered on an Identity Provider’s login screen.
GitHub#
Extremely popular community of people creating, publishing and collaborating on code. Accounts are free, and many people already have them especially since the target community for most hubs are people who also write some kind of code. We can setup GitHub authentication so you can either manage a list of specific GitHub handles in the JupyterHub admin panel, or so that members of a specific GitHub organisation or team are automatically authorised to use the hub.
<a different provider>#
We may be able to support other authentication providers, depending on your specific needs and the provider’s complexity. However, this should be used as a last resort and will come with an increase in management cost, to offset the extra engineering complexity. Please reach out to us if none of those above work for your use-case.
We will ask you what provider you want when we set up the hub. We can change the provider after the fact, but only if absolutely necessary.
Add a new user (Authorization)#
Not everyone who can authenticate is granted access to the hub - that would mean
everyone with a @gmail.com account can log in if you use Google as your
authentication provider! Instead, we support multiple ways for hub admins to
specify which users are authorized to be on the hub.
- Authorizing regular users
Currently, there are only three supported methods for authorizing regular users:
Manually add users via the admin panel in JupyterHub
(CILogon only) Allow all users who are logged in via a particular domain - so you can allow access to anyone who is part of your organization or educational institution.
(GitHub only) Allow all users who are members of a specific organisation or team. This approach gives you fine-grained control over who has access to the hub inline with your access policies on GitHub
Tip
If your hub has a range of different machine sizes or environments to choose from,
we can also configure which users can see which options based on their GitHub team
membership! For example, a team like @MyCoolOrg/all-users might be able to see
Small and Medium sized machines, but the @MyCoolOrg/advanced-users team can additionally
have access to the Large and GPU machines. You can manage these teams within GitHub.
Speak to a Hub Engineer about enabling this feature for your hub.
- Authorizing admin users
Admin users are authorized in a hub’s YAML config, with support from 2i2c staff.
Manually manage users from the administrator panel#
The Administrator Panel can be used to maintain the list of users
who are authorized to use your hub. You can access this panel by clicking
the ‘Admin’ button in the top bar in your hub control panel.
Alternatively, you can go to this URL in your browser:
https://<your-hub-url>/hub/admin
To add users#
Click the Add Users button. The Add Users dialog box will pop up.
Add one or more users, and hit the Add Users button to authorize all the users you just added.


Remove users from a hub#
You can revoke a user’s access to the JupyterHub by removing them from the allowed users list, using the admin panel.
Find the name of the user in your admin panel. If they have a running server, click the Stop server button to stop their running server.
Click the Delete user button for this user. Confirm the deletion in the dialog box that pops up.
After this, the user would not be able to log in. However, their files will not be deleted - if you add them later, their files will still be present.
GitHub Organizations and Teams#
Hub admins can control access to their hub by adding users to their GitHub Organization and Team. Hub admins require Owner permissions for their GitHub Organization in order to invite non-members to it (team maintainers or regular members do not have the power to invite non-members to GitHub Organizations). Inviting a user to the organization does not automatically grant the user access to a hub. A member of a GitHub Organization must be added to a GitHub Team associated with the hub in order to log into the hub with their GitHub credentials.
First time setup#
When we setup authentication to use GitHub orgs or teams, we create an OAuth app in the 2i2c org and ask hub admins to install this app upon first login to the hub.
See also
See our Infrastructure Guide on how 2i2c sets up GitHub OAuth apps.
You will be presented with a list of all the GitHub orgs related to your account. Some will already be authorised and have a green tick next to them, others where you are a member will have a “Request” button next to them. Orgs where you are an admin will have a “Grant” button next to them. Click the “Grant” button next to the target org associated with your hub before clicking the green “Authorize” button.
For example, see the below screenshot where we wish to grant the nasa-cryo-staging OAuth app access to the binderhub-test-org org.

How to grant org access to an OAuth app on GitHub#
Warning
If this is not done correctly, all users will report a 403 Forbidden error when they try to login. If this happens, please contact support and we can revoke all user tokens of the auth app to restart the process.
The OAuth app will now have the correct permissions to read the org info and hence users should be able to successfully log into their hub.
Manage your GitHub Organization#
Invite a non-member to the organization#
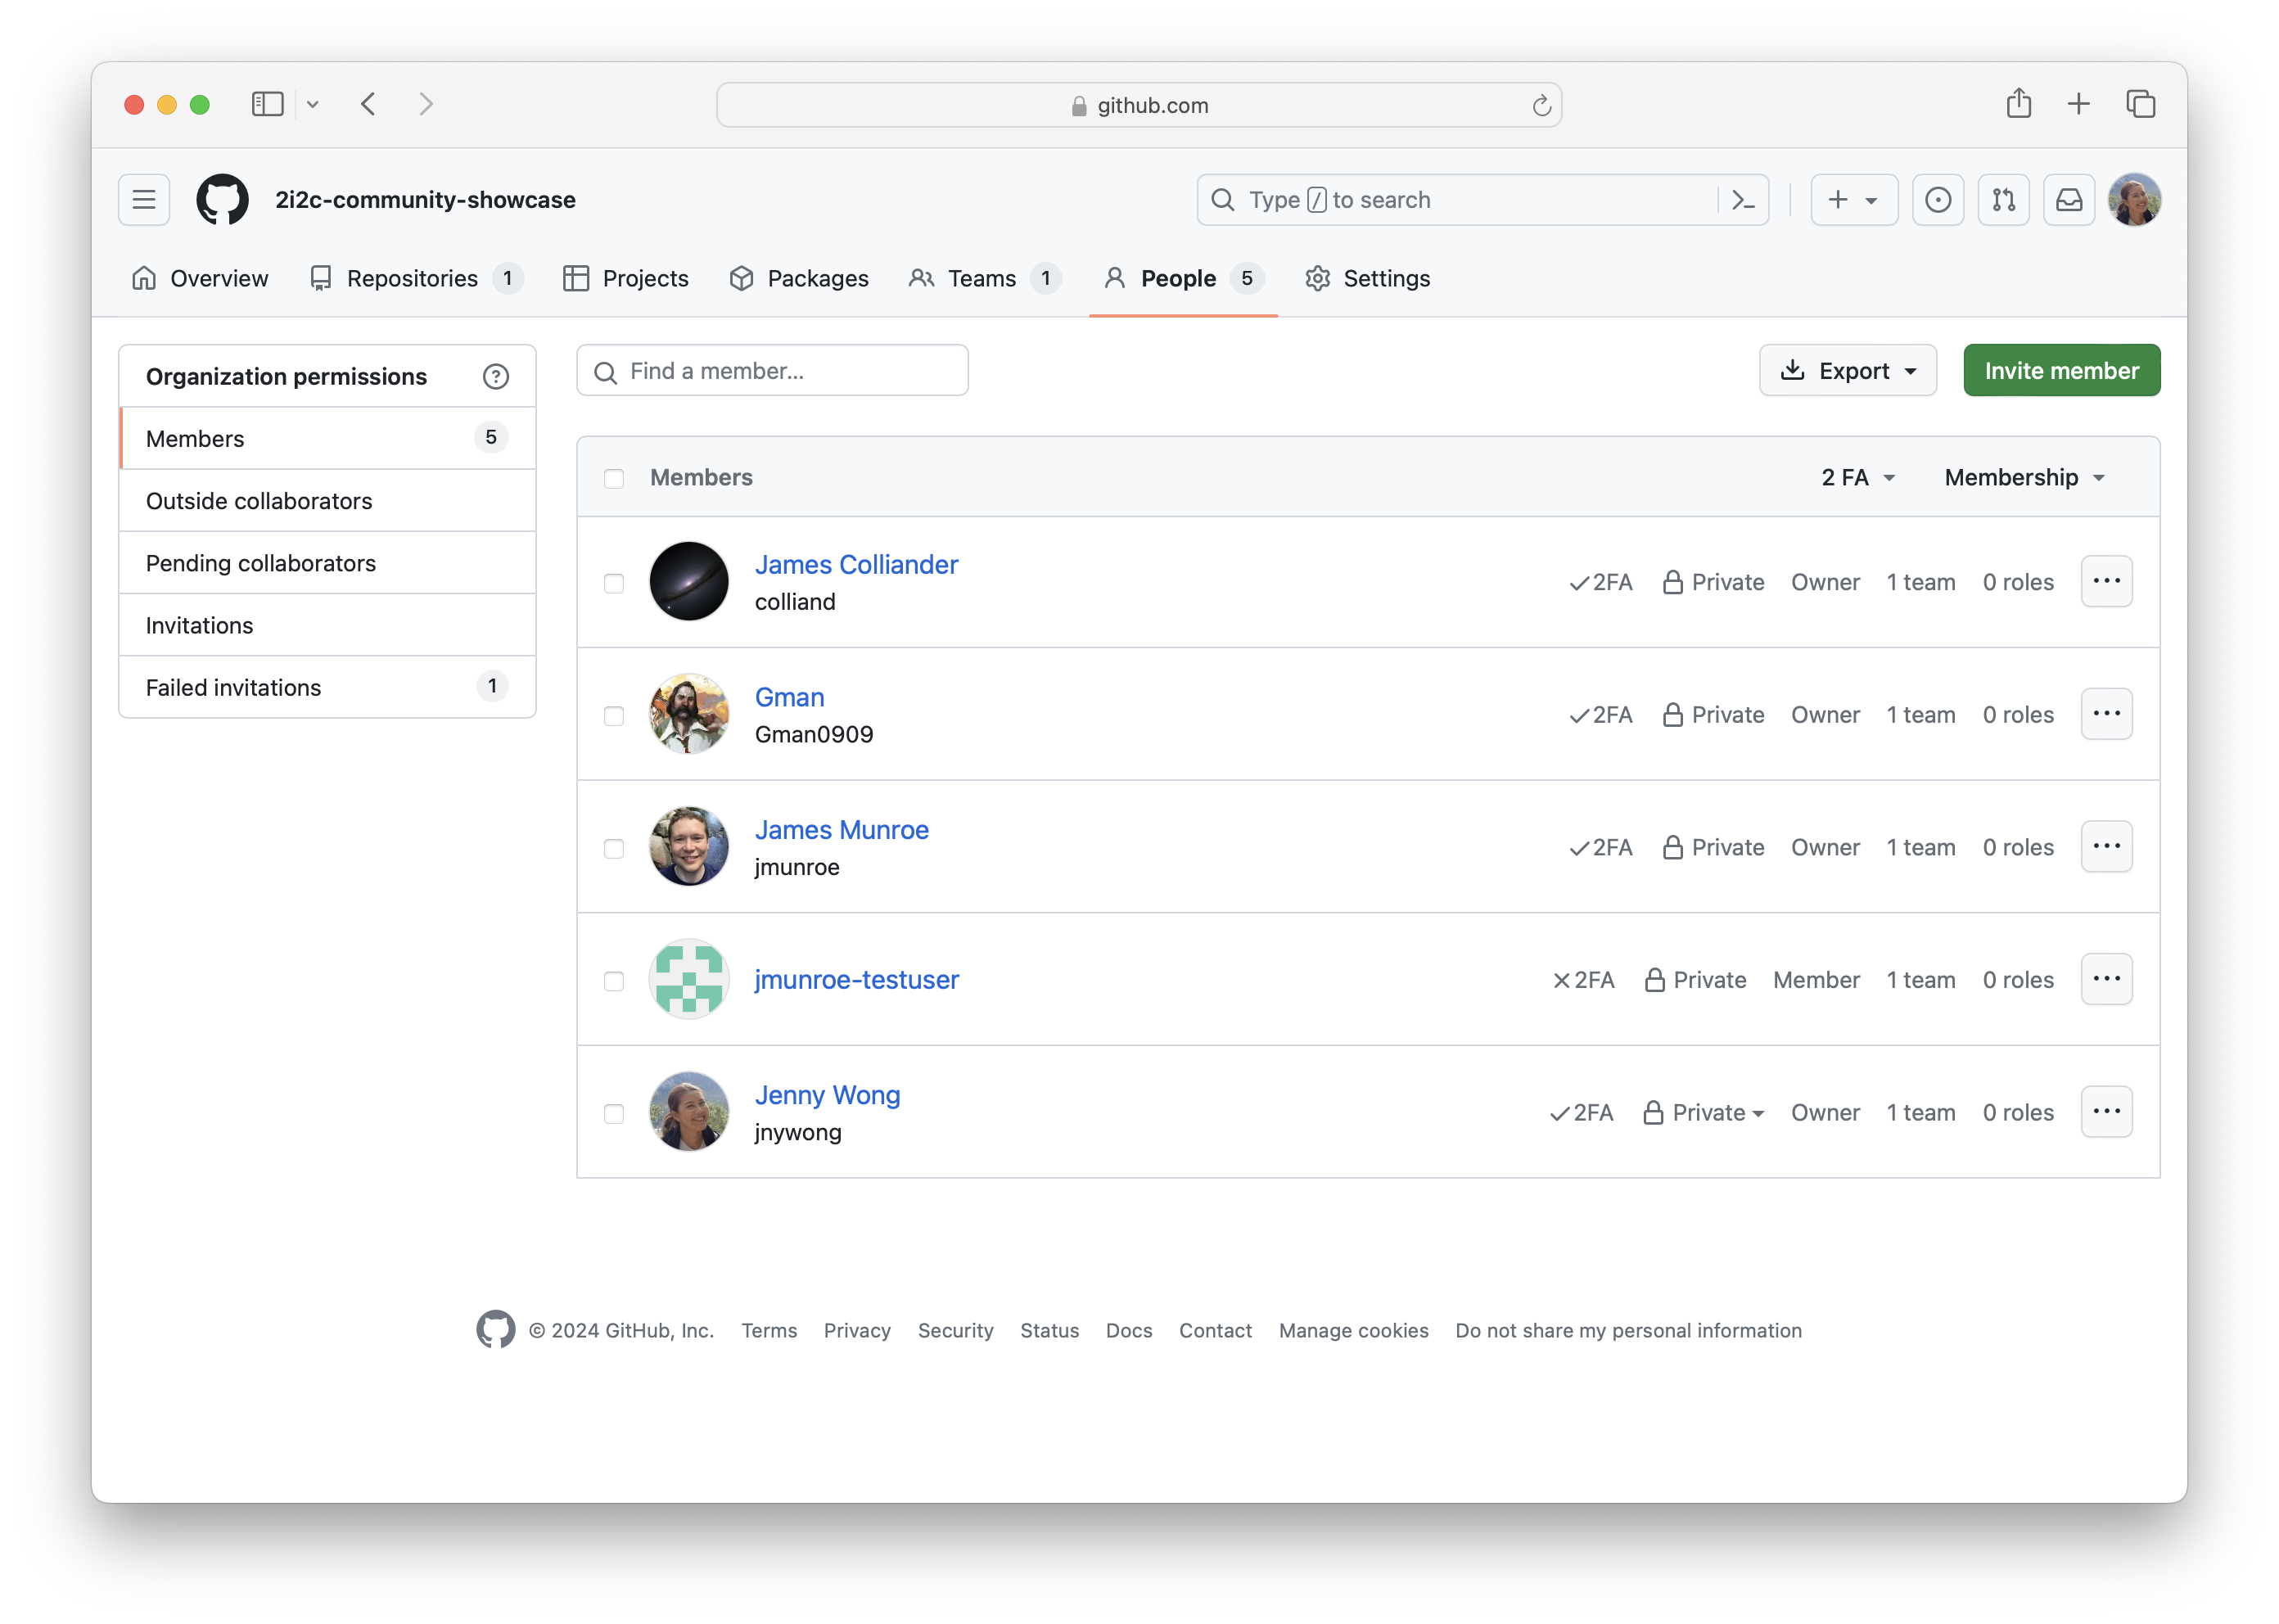
Screenshot showing a list of 2i2c-community-showcase GitHub Organization members. The People tab menu is located at the top; the green Invite member button is located in the top right; the Failed invitations tab is located in the left sidebar and the Member settings  icon is located next to each member account.#
Navigate to the GitHub Organization page at
https://github.com/<organization_name>Invite a non-member to the organization by clicking the green Invite member button and searching by username, full name or email address.
The invited user will receive an email and GitHub notification inviting them to join the GitHub Organization.
Warning
Invitations to join a GitHub Organization will expire after 7 days, after which you can cancel and then retry the invitation by clicking the Failed invitations tab in the left sidebar.
Once the user has accepted, they will become visible in the list of Organization members in the People menu tab.
Remove a member from the organization#
Members can be removed from the organization by going to the People menu tab.
Click the
icon next to the member account you wish to remove.Select the Remove from organization… option.
Confirm removal by clicking the Remove members button.
The user will receive an automatic email from GitHub notifying them that they have been removed from the organization.
Manage your GitHub Team#
A GitHub Team is defined and specially linked to a hub’s configuration when it is initially deployed. This special GitHub Team should be known to hub administrators. If not, please contact your community representative who deployed the hub or open a 2i2c support ticket.
Add a member to the team#
Add members to the GitHub Team associated with the hub so that users can log into the hub with their GitHub credentials.
From the GitHub Organization page
https://github.com/<organization_name>, click on the Teams menu tab.Click on the GitHub Team that authorizes access to the hub see a list of members.

Screenshot showing a list of access-2i2c-showcase GitHub Team members.#
Invite an existing member of the organization to join the team by clicking the green Add a member button and searching by username, full name or email address.
The account will instantly appear in the list of team members and the user does not need to accept an invitation to join. The user may choose to leave the team by clicking the Leave team button on the same page.
The user has authorization to log into the hub using their GitHub credentials 🎉
Remove a member from the team#
Hub admins can remove user access to a hub by removing their account from the GitHub Team.

Screenshot showing how to remove a member from the access-2i2c-showcase GitHub Team.#
From the GitHub Team page
https://github.com/orgs/<organization_name>/teams/<team_name>, check the box next to the member account you wish to remove (in this case,jmunroe-testuserin the screenshot above).Click the tab at the top of the list labelled 1 member selected.
Select Remove from team from the dropdown menu.
Confirm your choice in the pop up by clicking Remove members.
The account will instantly disappear in the list of team members and the user will not be notified.
Finding usernames#
Usernames are assigned depending on the kind of authentication provider your hub is using. In general, it matches whatever the visible ‘username’ in your authentication provider is. The table below lists the available providers, and how to determine their username.
Provider |
Username |
|---|---|
CILogon |
Email address |
GitHub |
GitHub user name |
Debug user authentication issues#
CILogon#
If users are running into strange errors when they log in (for example CILogon error pages that say “Looks like something went wrong!”), ask them to try these steps in debugging:
Try logging in with an
incognitowindow. This will help determine if their issue is due to some cookie / cache that is stored on their machine.Ask them to clear their cookies / cache for all CILogon websites. For example, here are the Google Chrome instructions to clear cookies.
If using
CILogon, double-check that they’ve signed in with the correct account, and ask them to switch accounts if needed.